If you want the storage space of a traditional hard drive and the speed of an SSD (solid state drive) you should look into a hybrid drive like the Seagate Momentus XT, which combines the best of both worlds. This review will show you how the hybrid hard drive performs and how to upgrade your Mac or Windows notebook to a faster hybrid hard drive.
I just upgraded the hard drive in my new MacBook Pro with the Seagate Momentus XT. I bought it knowing that I would likely do so. Getting such a drive from someone other than Apple is often a money saver. In this case a MacBook Pro upgraded to a faster 7200 rpm 500GB hard drive from Apple only costs another $100. But it also is not a hybrid hard drive like the Seagate Momentus XT, and that’s where the real benefit comes. With this drive there is a nice performance boost.

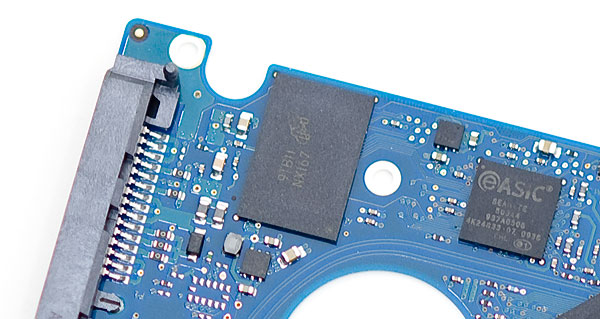
Seagate Momentus XT Hybrid Hard Drive
Benefit of Seagate Momentus XT over Most HDs Pre-installed
The Seagate Momentus XT is a special kind of notebook hard drive. It is a 7200 rpm drive, which means that is faster than the stock drive that comes in the base model MacBook Pro or MacBook. That drive is only a 5400 rpm (revolutions per minute). It is the speed at which the drive spins while the computer is reading the drive. Think of a record player or a CD spinning as the music is played. It is the same concept.
The Solid State Flash Memory is the key - image from AnandTech
In addition to spinning faster it has 4GB of solid state flash storage built-in. An SSD is a new kind of hard drive that is very fast and requires less power because it has no moving parts. In small quantities, like those in USB flash drives that most people use to carry around documents, the memory is not that much. But in hard drive sized quantities they can be hundreds of dollars. The average 128GB SSD, which is small when compared to 320 or 500 GB drives in most basic notebooks, is at minimum about $150. You can get the largest notebook hard drive available in the traditional spinning form for less than that – a 1TB Western Digital Scorpio Blue internal notebook hard drive can be purchased for as little as $118 at Newegg.
Western Digital Scorpio Blue 1TB Notebook Hard Drive
The Seagate Momentus XT brings both the capacity of a traditional spinning optical drive together with the speed of an SSD. The result is a hybrid of the two, which is why it is called a hybrid hard drive. Installing it in the MacBook Pro or any laptop is not that difficult and results in a nice speed boost.
The Speed Boost from Upgrade
Notice below how similar it is in speed to an SSD, the fastest drives available:
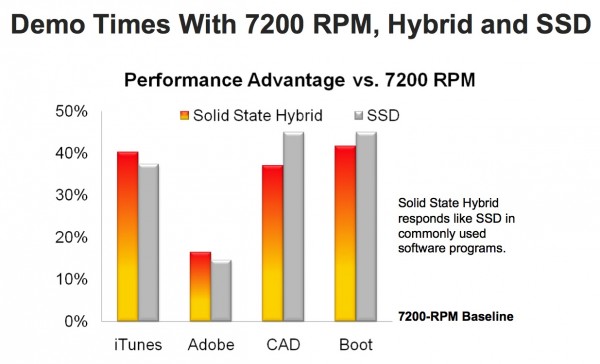
Benchmarks from Seagate of the Momentus XT speed compared to an SSD
We timed the boot up speed of this new drive in comparison to the old one that came with our machine. Boot times were reduced to a third of the time, from around a minute and a half on average to less than 40 seconds with the Seagate Momentus XT installed.
The other boost is starting applications. On a Mac we often judge the speed of app load times by how many bounces the dock icons perform while loading. With the stock drive, one program I have that takes forever to load would bounce a dozen or so time. With the new drive it reduced the bounces to about three or four. Other applications bounce only once or twice where they used to bounce two or three times. By comparison, on the MacBook Air with an SSD drive, the same apps load in 1 bounce or instantly. So the hybrid drive is closer to an SSD than a traditional drive.
The last performance bump is in loading Internet pages. The biggest bottleneck of surfing is usually your network connection. But a fast hard drive will help your browser download the data to the temporary folder on the hard drive and then load it into the browser for display faster. With the Seagate Moments XT installed, pages pop on-screen faster.
Below is a video demonstrating the speed of the Seagate Momentus XT from the company’s website.
Warnings
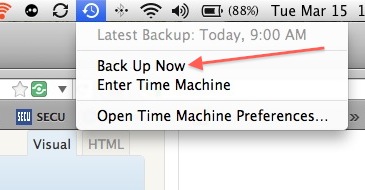
There are a couple of warnings regarding this drive. Some have reported having problems with the drive in older MacBooks at Apple’s support forums. Even failures have taken place. But the only other report about using it in the newest MacBook Pros said it was a good experience. And we haven’t had any problems in the short time we’ve had it installed. So, if you install this drive, be sure to run Time Machine backups on the Mac side or a similar Windows backup solution to be safe. And remember to hold onto your old manufacturer installed hard drive. I will be keeping the drive that came with my Apple in the box that my new drive came in to be safe. That way if I have a failure I can just install it and boot up the system and restore from a recent backup.
Preparing for the Upgrade – Backup on a Mac
To do the hard drive upgrade, the first step begins before you ever even shut down the system and open it up. We’re talking about backup. Whatever your backup solution is, do it now! The best way on a Mac is to use Time Machine. If you have the menu item in your menu bar, just click on it and choose “Back Up Now”.
If you’ve been running Time Machine all along, it should not take long. For those who have not, just open Time Machine preferences from the System Preferences window. That can be found under the Apple menu in the upper left. Make sure it is set to ON. Here’s our guide to setting up Time Machine on your Mac.
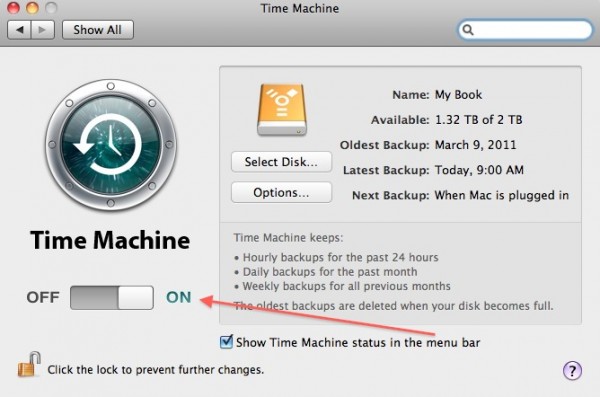
It should now be in the menu bar and you can click on it and back up the system. If this is the first time you have done it, it will take a while.
Preparing for the Upgrade – Backup on Windows
On the Windows side of things, we like the idea of starting fresh when doing a hard drive backup. The reason is over time a Windows PC gets filled with software and hidden “kludge” that can slow it down. It’s a good idea on a Windows computer to start fresh once a year.
So instead of doing a complete backup, just get your personal stuff. One way to do this is just copy the user folder to an external USB hard drive. That way you have everything from documents, music, pictures, videos and a lot of system preferences and software preferences. Also make sure you have a way to reinstall Windows and your software. Go through the My Programs folder on the Start menu and take inventory. Do you have discs or install files for each one. This is also a good time to get rid of software you are not using. Just don’t reinstall it.
 There are only a few reasons to not follow the above advice:
- You have a new system and don’t suffer from the “kludge” that slows down the system
- You don’t have a Windows install disc or your software installation discs or files
- You just don’t want to be bothered – you want to just install the hard drive and restore the system like it is
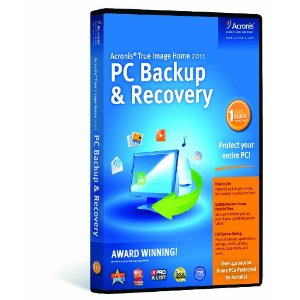
In this case, the best way is to make a bootable restore disc with a program like Acronis True Image. It will cost you something, but will create a disc that will put everything back just as you left it pre-upgrade. It is $49.99 direct or less than [amazon_link id=”B003VIVY7G” target=”_blank” ]$37 at Amazon[/amazon_link]. But for that you have a great backup solution even after the upgrade. We really like the program for Windows backup and restoration. The result will be a DVD or set of DVDs that can be used like a Windows restore disc only with all your programs and documents in place.
We do not have the space or time to take you through the steps of using Acronis. Their web site has a PDF with plenty of information about how to run the application.
If you choose to go the first route and reinstall Windows, make sure to get the drivers for your computer. Go to the manufacturer’s website and find the drivers in the support section. Download them to an external USB drive. I put mine in a single folder. The primary things to look for are:
- Chipset drivers
- Video card drivers
- Network drivers (especially wireless)
- Other special drivers for unique hardware like finger print readers, special button controls, etc.
Removing the Old Hard Drive – MacBook Pro
 Here’s what you will need:
- New hard drive
- Torx T-6 screwdriver
- Very small Philip’s head screwdriver
- Piece of tape
On the MacBook, removing the hard drive involves taking the entire bottom plate off the system. You will use a Philip’s head screw driver to do this. We recommend a jeweler’s screw driver with a very tiny head. Turn the MacBook over and rest it on a flat surface that won’t scratch the lid.
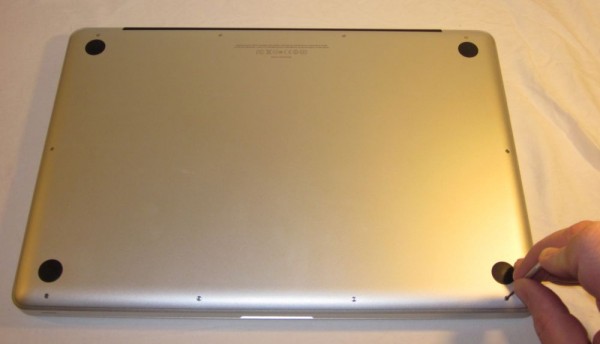
Turn over MacBook Pro and unscrew 10 screws
Take a large piece of tape and stick it to the surface of the work space sticky side up. This will hold the screws so they don’t roll of the table onto the floor never to be seen again.
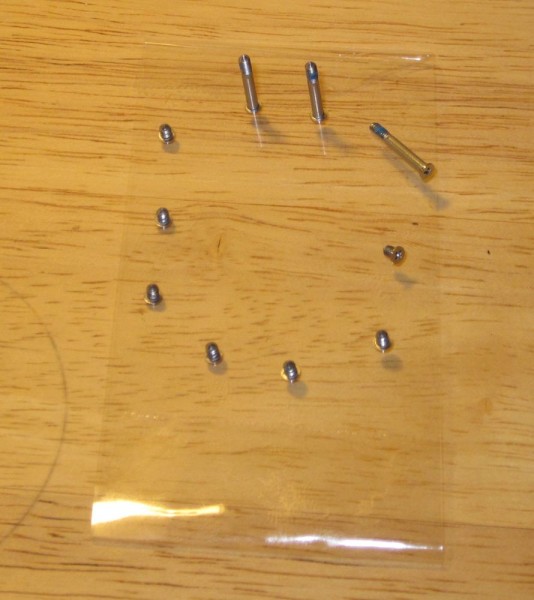
Use tape to hold loose screws
Now remove the ten screws. I like to put the loose screws on the tape in a pattern exactly like they would fit in the computer. That is because three of the screws are longer. This helps you remember which goes in which spot.
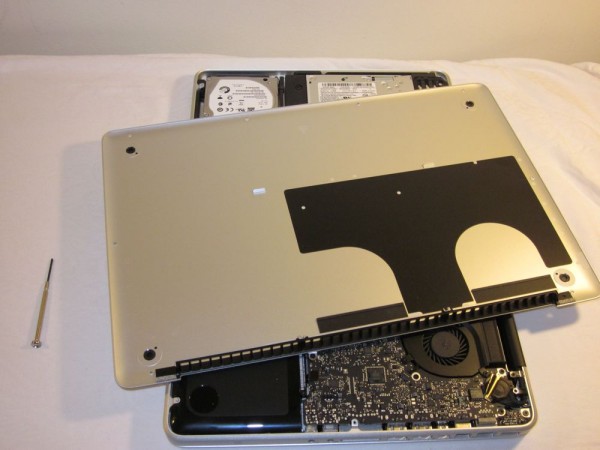
After all ten screws are removed, pull the bottom off the computer. It is easiest to get at it by pulling up on the side with the black fan vent. Put the bottom plate in a safe place.
The MacBook Pro hard drive is fastened in place by a plastic bar and two screws or posts that hold it into place. Use the Philip’s head screw driver to loosen the screws. They can stay in the bar. Once it is loose, pull out the bar with the screws in it and place it on or next to your tape.
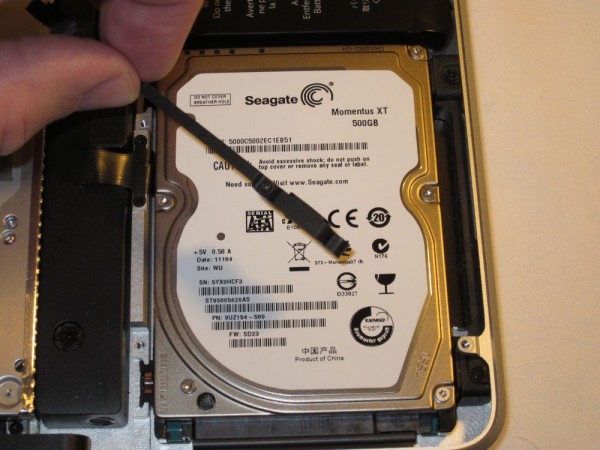
The hard drive will have a plastic tab. Pull up on it carefully.
Pull up on tab to remove drive
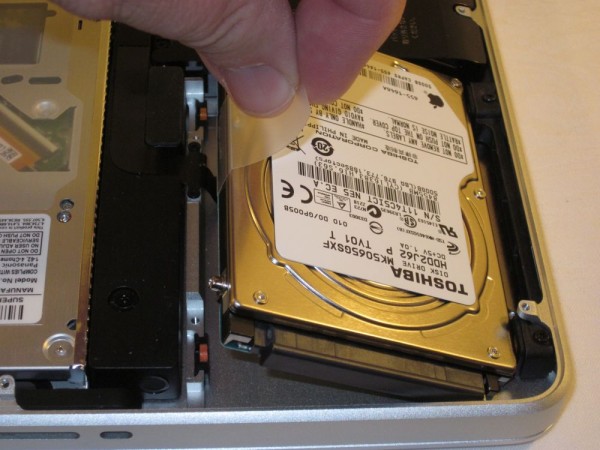
There is a connector with a thin and delicate ribbon. You will have to carefully remove this connector without damaging the ribbon. If you do you will likely have to pay to fix it, as Apple will probably not give you warranty service on it since you damaged it.
Carefully remove connector
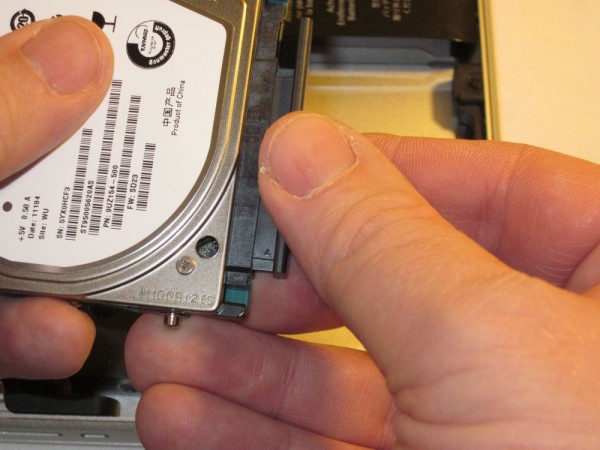
There are four posts or screws on drive. Unscrew them with a Torx T-6 screw driver. We got one from our Lowe’s store cheap.
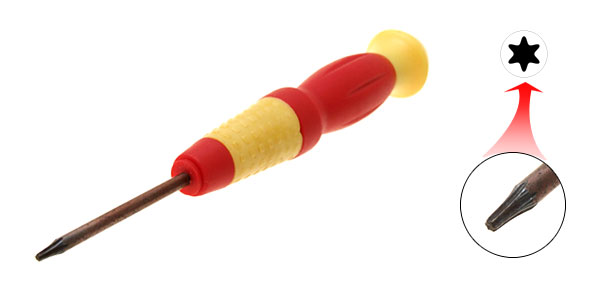
Torx T-6 Screwdriver
It has to be the T-6 size. These have a star shape on the end. Once removed place these on the tape.
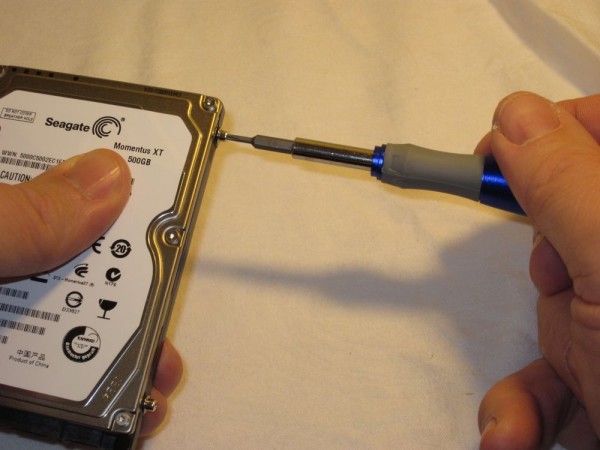
Remove the Torx screws from old drive and put them on the new one
Removing the Old Hard Drive – Windows
On a PC this is usually not that hard. On the bottom of the computer you will usually find a plat that fits over the hard drive compartment. It will have a symbol that looks like three circles stacked on top of each other. With a tiny Phillip’s head screw driver (we like jeweler’s screw drivers) unscrew the tiny screw or screws. Take a piece of tape and stick it to your work surface with the sticky side up. Place the screws on it to keep them from rolling off onto the floor never to be found again.

Unscrew any screws for the bottom plate on Windows PC
Inside the compartment is likely a hard drive with a plastic tab connected to one side. Usually you can just pull the tab and lift the drive out. Sometimes the drive will be secured by a bar, screws or some other mechanism to keep it in place. If it does, unscrew it.
Once you are able to lift the drive, pull it out carefully. There will be a connector that will usually be connecting the hard drive to the computer. Sometimes the drive just rests in the compartment with a piece attached to the drive that can be removed. Other times there is a connector with a thin ribbon attaching it to the computer. Whichever it has, carefully remove it. If it is a loose piece put it near or on the tape. If it is a ribbon rest it carefully in the computer. Don’t damage it whatever you do.
Installing the New Hard Drive – Mac
It is now time to put the new hard drive into the system. The Seagate Momentus XT comes in a wrapper. Rip it open and take the drive out. Put the four posts that you removed from the MacBook’s hard drive onto the sides of the drive with the Torx T-6 screw driver. Don’t over tighten them.
Reconnect the ribbon connector. The plastic connector can only go on one way. Make sure to connect it with the ribbon under the drive and the printed side facing you. The connector will be closer to the edge of the system.
Case has four holes in which posts on hard drive are inserted
Insert the two side posts into the tiny holes in the hard drive compartment along the edge closest to the front of the MacBook. Let the drive drop into place and then replace the black plastic bar that had the two screws in it. Tighten them snuggly.
While you are in here, you might want to upgrade the memory, but we will save that for another post.
Now it is time to replace the bottom plate. You may want to check one last time to be sure the connector is secure. Put the plate back down and screw in the screws being careful to put them back in the right place. The three long screws will go into the holes closest to the back of the system. If the system is upside down and the black fan vents are on your right the three screws go into the three holes on the long right side closest to you.
Installing the New Hard Drive – Windows
The steps on the Windows PC will be similar to the Mac. Attach any connectors or any thing else you had to remove from the old drive. Insert it exactly like you took it out and replace any hardware that was used to hold it in place if there was any.
Video Tutorial
Here is our video tutorial on how to replace the hard drive in a MacBook Pro:
Restoring the Operating System – Mac
If you did a full Time Machine backup just before the project, you have an easy restoration process. Boot the system to make sure it works. If it starts up giving you the familiar boot up tone and you see a folder icon with a question mark in it, then you did everything right. Put the Mac OS X Install disc into the drive and then shut it back down again by pressing the power button. We will use it to restore the backup.
Plug in the external drive used to make the Time Machine backup. Reboot with the disc in the drive. At first it will show the typical Apple symbol on the white screen. Then it will have a folder with a question mark again. This means it cannot find the operating system. That is normal. It will boot from the DVD instead.
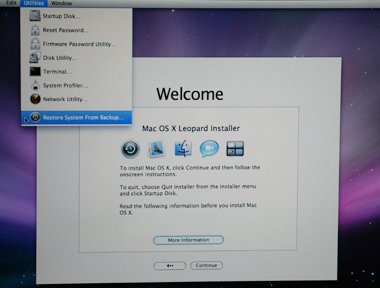
Time Machine Restoration - image from MacLife
Once the system boots from the DVD, it will ask you what language to use. Choose your language and click the arrow in the lower right. Wait till you see the menu across the top of the screen. Choose Utilities and then “Restore System from Backup”. Follow the directions choosing the right backup and let it restore. It will take a while, so go do something else. When it is finished, reboot. You should see your system just like you last left it before you started the upgrade.
In the video below we take you through the steps of restoring the OS from a Time Machine backup using the OS X installation DVD and our external hard drive with the backup on it.
Restoring the Operating System – Windows
To get back up and running you will have to either reinstall Windows or boot with the Acronis True Image recovery disk you created. Follow the information in the Acronis PDF to learn how to do that.
To restore with Windows just boot with the Windows install disc and follow the instructions. Microsoft has a guide on how to do this. Follow the instructions there. When finished, there are a few things you should do first. Find the external drive where you saved all the files you downloaded from the manufacturer’s support site. Run each file in this order:
- Install the chipset driver for your computer and reboot
- Install the video card drivers and reboot
- Install the network drivers, if needed (including wireless and wired)
- Install other drivers
- Install all operating system updates before you install software like Office and other applications
- Install programs
- Restore your files by copying form the hard drive or USB drive backup you made
You can find additional resources in our guides that show you how to move Windows 7 to a larger hard drive, how to reinstall Windows 7 from scratch and how to reinstall Windows 7 with an upgrade DVD, without installing your old OS.
What to do with your old hard drive:
You can easily turn your old hard drive into extra storage by following our guide to installing your old hard drive in an external hard drive case.
Conclusions
Upgrading almost any stock manufacture’s notebook hard drive to the Seagate Momentus XT should result in a nice performance boost. The only way this wouldn’t be true was if you had an SSD or a fast 7200 rpm hard drive from the factory. In the case of the latter, it will still likely help a little.
We did this upgrade and got a faster 500GB drive than you can get from Apple. We bought it at Best Buy for $150, but Amazon has the [amazon_link id=”B003NSBF32″ target=”_blank” ]Seagate Momentus XT[/amazon_link] for $100 and we should have gotten it there.

Amazon has the Seagate Momentus XT for under $100
Upgrading to the Seagate Momentus XT was well worth the cost and time. We recommend it. We are slightly concerned about all the bad warnings we found online about drive failures with this model. So we are going to be very careful about continual backups. The other thing to remember is you need to wait a little while before seeing the most performance boost as the hard drive adapts to your system usage. But after just a short time we are seeing enough of a boost to describe our upgrade with one word: “Winning!”
Technical Specs
| Specifications |
| ||||||||||||||||||||||||||||
| Performance |
| ||||||||||||||||||||||||||||
| Configuration/Organization |
| ||||||||||||||||||||||||||||
| Reliability/Data Integrity |
| ||||||||||||||||||||||||||||
| Power Management |
| ||||||||||||||||||||||||||||
| Environmental |
| ||||||||||||||||||||||||||||
| Physical |
| ||||||||||||||||||||||||||||
Related Posts
-
Carrying a bulky charger can really cut down on the portability of your notebook. We've…
-

The Mission Mercantile Laptop Sleeve and Laptop Sleeve Vertical are a beautiful way to carry your…
-
Hard-core PC gamers used to literally carry around a desktop computer rig to gaming meet-ups because…