If you took advantage of the $30 student discount on Windows 7 upgrades through Digital River you may have run into a roadblock when you tried to install the upgrade; especially if you wanted to do a clean install of Windows 7.
To do a clean install you need to boot from a disc or flashdrive instead of starting the install process from inside your current version of Windows. Another reason you may need a bootable version is if you had the Windows 7 release candidate installed on your computer beforehand.
Thankfully there are 2 simple solutions to making your Digital River Windows 7 upgrade bootable.
- You can create a bootable DVD
- You can make a 4 GB or larger USB drive Bootable.
How to turn your Windows 7 EXE file into a bootable disc or drive:
The first step is to click on setup and let it extract the files to the expanded setup†folder. Even though this folder has a boot and autorun file simply putting it on a flash drive or burning it to a CD won’t work so you’ll need to do the following.
Turn your Digital River Windows 7 upgrade into a bootable DVD:
- Download oscdimg from SevenForums and extract it to C:WindowsSystem32
- Open an elevated command prompt by typing cmd.exe in your Vista Search box. When it shows up right click and select run as administrator.
- Paste the following into the command prompt, be sure to put your username in:
Oscdimg.exe u2 bC:Usersyour_usernameDesktopexpandedSetupbootetfsboot.com h C:Usersyour_usernameDesktopexpandedSetup C:7.iso - Press enter and wait for your ISO to be made.
- Burn to a DVD with a burning program and you are ready to go.
These directions are expanded upon the original guide posted on SevenForums.com to be friendlier to novice users.
Turn your Digital River Windows 7 Upgrade into a bootable Flash Drive:
- Get anything important off of your 4 GB or larger flashdrive
- Download WintoFlash from Softpedia and unzip it.
- Run WintoFlash
- Click on Task
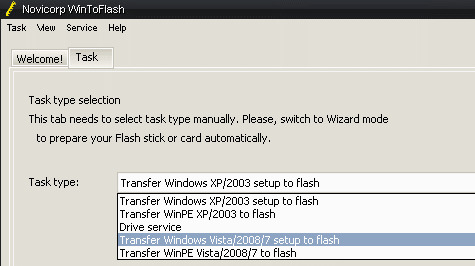
- Choose, Transfer Windows Vista/2008/7 setup to Flash†and click Create
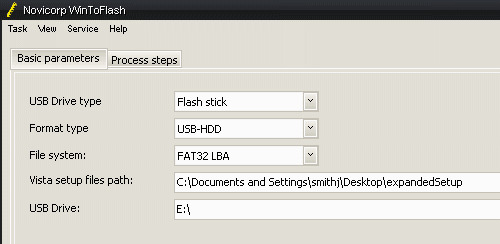
- Select your expandedSetup†folder for the Vista setup files path
- Choose your Thumbdrive location.
- Click Create and wait for it to create your bootable Windows 7 upgrade USB drive.
From there you just need to Install Windows 7 like normal.
