This tutorial will show you how to configure Time Machine for the first time. Time Machine makes backing up your Mac’s files, effortless. If you haven’t configured Time Machine on your Macbook or iMac yet, right now would be the perfect time to do so.
Why should you use Time Machine?
![]()
They say, “Storage is cheap, your data not so much.” I have been using Time Machine on my Macbook Pro since day one. Computers are designed to make our lives easier and not the other way round. A comprehensive backup of your system gives you the peace of mind that you deserve.
A lot of users have various myths about backing up their systems. Some are afraid they are going to waste far too much space while others worry about having the system run slow during backup operations.
However, once Time Machine is configured, it will, like most of the things designed at Apple, get your task of backing up done with no effort from your end. You can use it at a later date to restore the whole system or to recover a few files to a previous state. In case you’re wondering why they call it the Time Machine, you’ll learn that in a bit.
What do you need for Time Machine?
Both Leopard and Snow Leopard have Time Machine built right into them. No extra software is required. All you need is a hard drive to store backup information. While you can backup to a different partition on your Mac’s hard drive, a more sound thing to do is to use a separate external hard drive.
Got a drive ready? Let’s get to setting up your very first Time Machine.
Setting up Time Machine for the first time
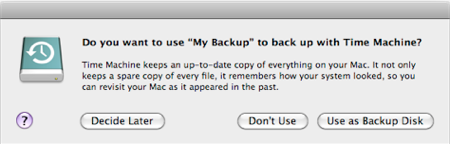
If you have never configured a Backup Disk on your Mac, you will be prompted every time you connect an external disk and asked if you would want to use this disc with Time Machine. Select Use as Backup Disk to use this disk.
In case, you need to partition your drive first select Decide Later and create your partitions using Disk Utility. Your backup destination should ordinarily be at least twice the size of the disk you are backing up. Once the drive is ready, go to System Preferences > Time Machine and click on Select Backup Disk.

Select the disk from the list that appears and click on Use for Backup.
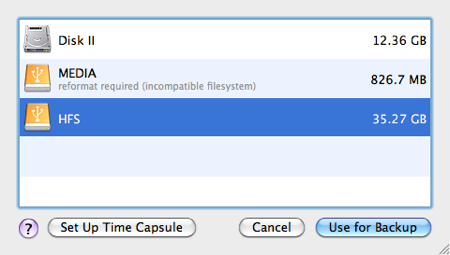
Selecting Disk to be used for Time Machine Backup
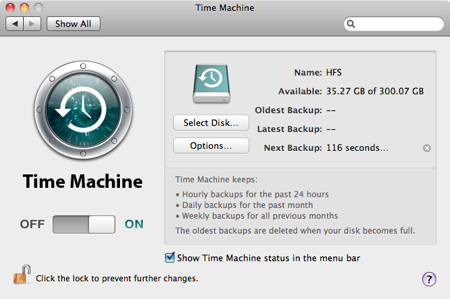
That’s all you actually need to configure. Apple does not believe in confusing its users by giving them a lot of options. Time Machine does not ask you for backup frequency. It is preconfigured to keep the following backups.
- Hourly Backups for past 24 hours
- Daily Backups for past one month
- Weekly Backups for all previous months
The oldest backup is deleted when the Backup Disk runs out of space.
Since you have already selected the Backup Disk, the Time Machine slider should now be set to ON and the countdown before the First Backup should have begun.
The first backup will take quite some time, so you should do it in the evening so that you can leave your Mac switched ON for the backup to finish overnight.
You can use your Mac at all times during backups and your work will not interrupt the backup process. After the first backup, Time Machine will attempt to backup all the files that have changed since last backup on an hourly basis.
You can see the progress of your backup in the TIme Machine preferences window or by clicking on the Time Machine icon in the Menu Bar.
![]()
Optional Time Machine Settings
In the Time Machine preferences window, click on Options to select which items to exclude from the backup. By default, all external drives are excluded.
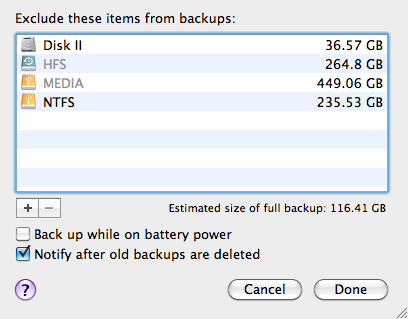
Items excluded from Time Machine Backups
You can also select if you want to allow Time Machine to backup when running on battery power. Personally, I prefer having my Mac backed up only when plugged in.
Browsing Time Machine
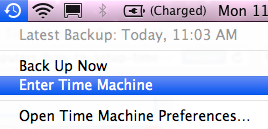
You can browse through Time Machine you just created by selecting Enter Time Machine after clicking on the menu bar icon.
You should now see where Time Machine derived its name from.
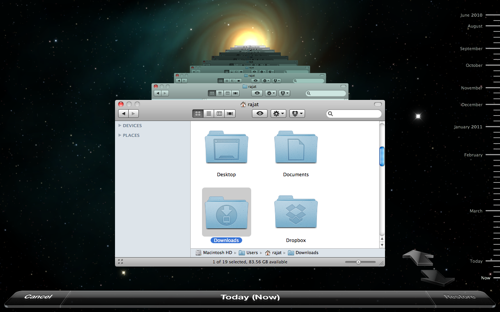
Browsing the Time Machine in Mac OS X
You can use the timeline on the left to browse to a previous week. As you can see, my Time Machine dates back to June 2010.
In the next tutorial, we’ll show you how to restore a specific file from Time Machine and also how to restore the full system from backup.
Related Posts
-
Here is a guide on how to detect Mac malware and safely remove it from…
-

With recent updates to the Mac's OS X El Capitan, and the new iOS 9.3,…
-
Like on a PC, most of your Mac's software lives in the same place on…