Windows 7 has a simple and useful file management feature called Libraries. With it a user can more easily find their files and manage them in the Windows Explorer interface.
The primary benefit of a Windows Library is keeping similar file types that may be stored in different locations all in one place. For example, let’s say I have pictures stored in the My Pictures folder (located at ‘C:UsersUserNamePictures’ by default). But I also have a network drive with some pictures and a piece of software that for some reason requires that I put pictures related to that program in a different folder. Our church’s worship presentation software has this requirement. To keep access to all three of these different locations easily accessible in one place, I can set up a Library that points to all three spots, but to the user look like they are all in one spot.
Another reason might be to keep access to my software installation files. On a notebook I may have a folder for Downloaded files that I find online, like some cool utility that I learned about while away from home. But at home I may have a network attached storage drive that has all my installation files in a folder there. I can set up a library that will point to both locations, so that when I am looking for a program that I want to reinstall or share with a friend (because it is a legally distributed application) it doesn’t matter where it is, I can just look in the Software Library folder.
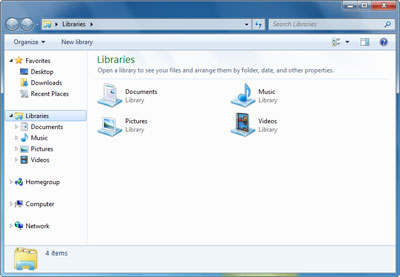
Windows 7 comes with a few Libraries by default. They are for Documents, Music, Pictures and Videos. I have one for Downloads and My Shout files. My Shout are for the worship program our church uses.
Microsoft has a simple guide for working with these Libraries. The process of creating or adding a folder to a library is only a right-click away in Windows Explorer. (If you are having trouble watching this video in your browser you can download it to play back on your computer.
Creating a New Library
The create a new library, open Windows Explorer (double-click the My Computer icon or hit WIN+E where WIN stands for the Windows Key) and find the folder. Then right-click the folder and choose Include in libraryâ€, and then Create new libraryâ€. Give it a name.
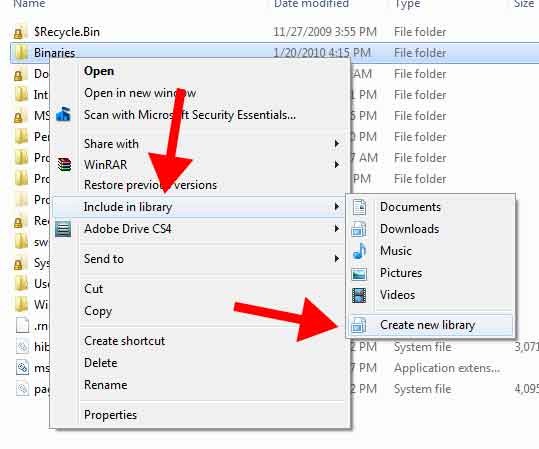
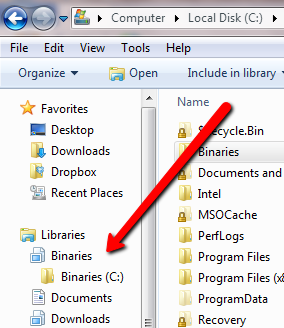
From now on it will show up in the Library list in the upper left hand section in Windows Explorer’s tree view.
If you decide you don’t want that folder in the Library, just right-click it in the view above and choose to remove it from the pop up menu. To delete a library highlight it and delete it as you would any other folder.
Adding a Folder to an Existing Library
The process of adding a folder to a library is the same as creating one. The only difference is in what you choose from the pop up menu. Instead of picking Create new library†choose the name of the already existing library you want to use.
After creating or adding a folder to a library, it will show up in that folder when the folder is highlighted as if that item is in that folder. The Library is not an actual folder but just a special kind of Windows shortcut.
Related Posts
-

Microsoft’s Windows operating systems let users do a lot of things. Every day, machines loaded…
-

Even though Windows 10 has made upgrading Windows easier than ever, sometimes you still need…
-

On August 2, 2016 the Windows 10 Anniversary Update came out with some cool new features…