Microsoft updated Windows recently and it’s getting rave reviews, even from Mac fans. As a result we thought we’d show MacBook owners how to install Windows 10 on a MacBook. We’ll show users how to use Parallels 11, recently updated to support Windows 10, or the Boot Camp option that’s built into OS X. There’s a third option using Crossover Mac that lets users run Windows software without installing a full version of Windows .
How to Download a Windows 10 ISO Image File
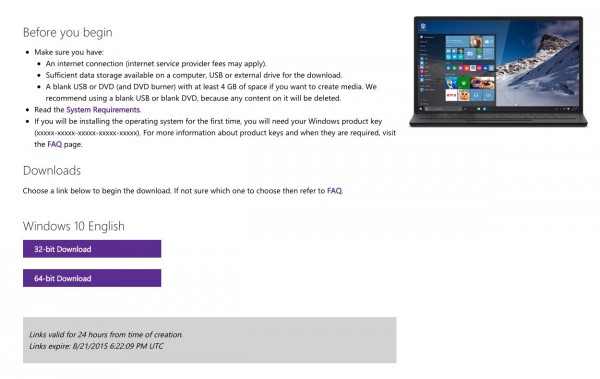
Microsoft doesn’t make it easy to find the Windows 10 ISO file. An ISO file holds all the files needed to create an installation DVD or flash drive in one single file. Head over to the Microsoft download page for Windows 10. Follow the steps below:
- Select Edition – in the middle of the above linked page there’s a drop down box. Choose Windows 10 unless you know that you need one of the other options (Windows 10 N, KN or Single Language version).
- Click on Confirm.
- Select the prefered language in the new drop down box.
- Click on Confirm again.
- Click on 32-bit Download or 64-bit Download (most will want the 64-bit Download version).
The file will download.
Install Windows 10 on a MacBook Using Parallels Desktop
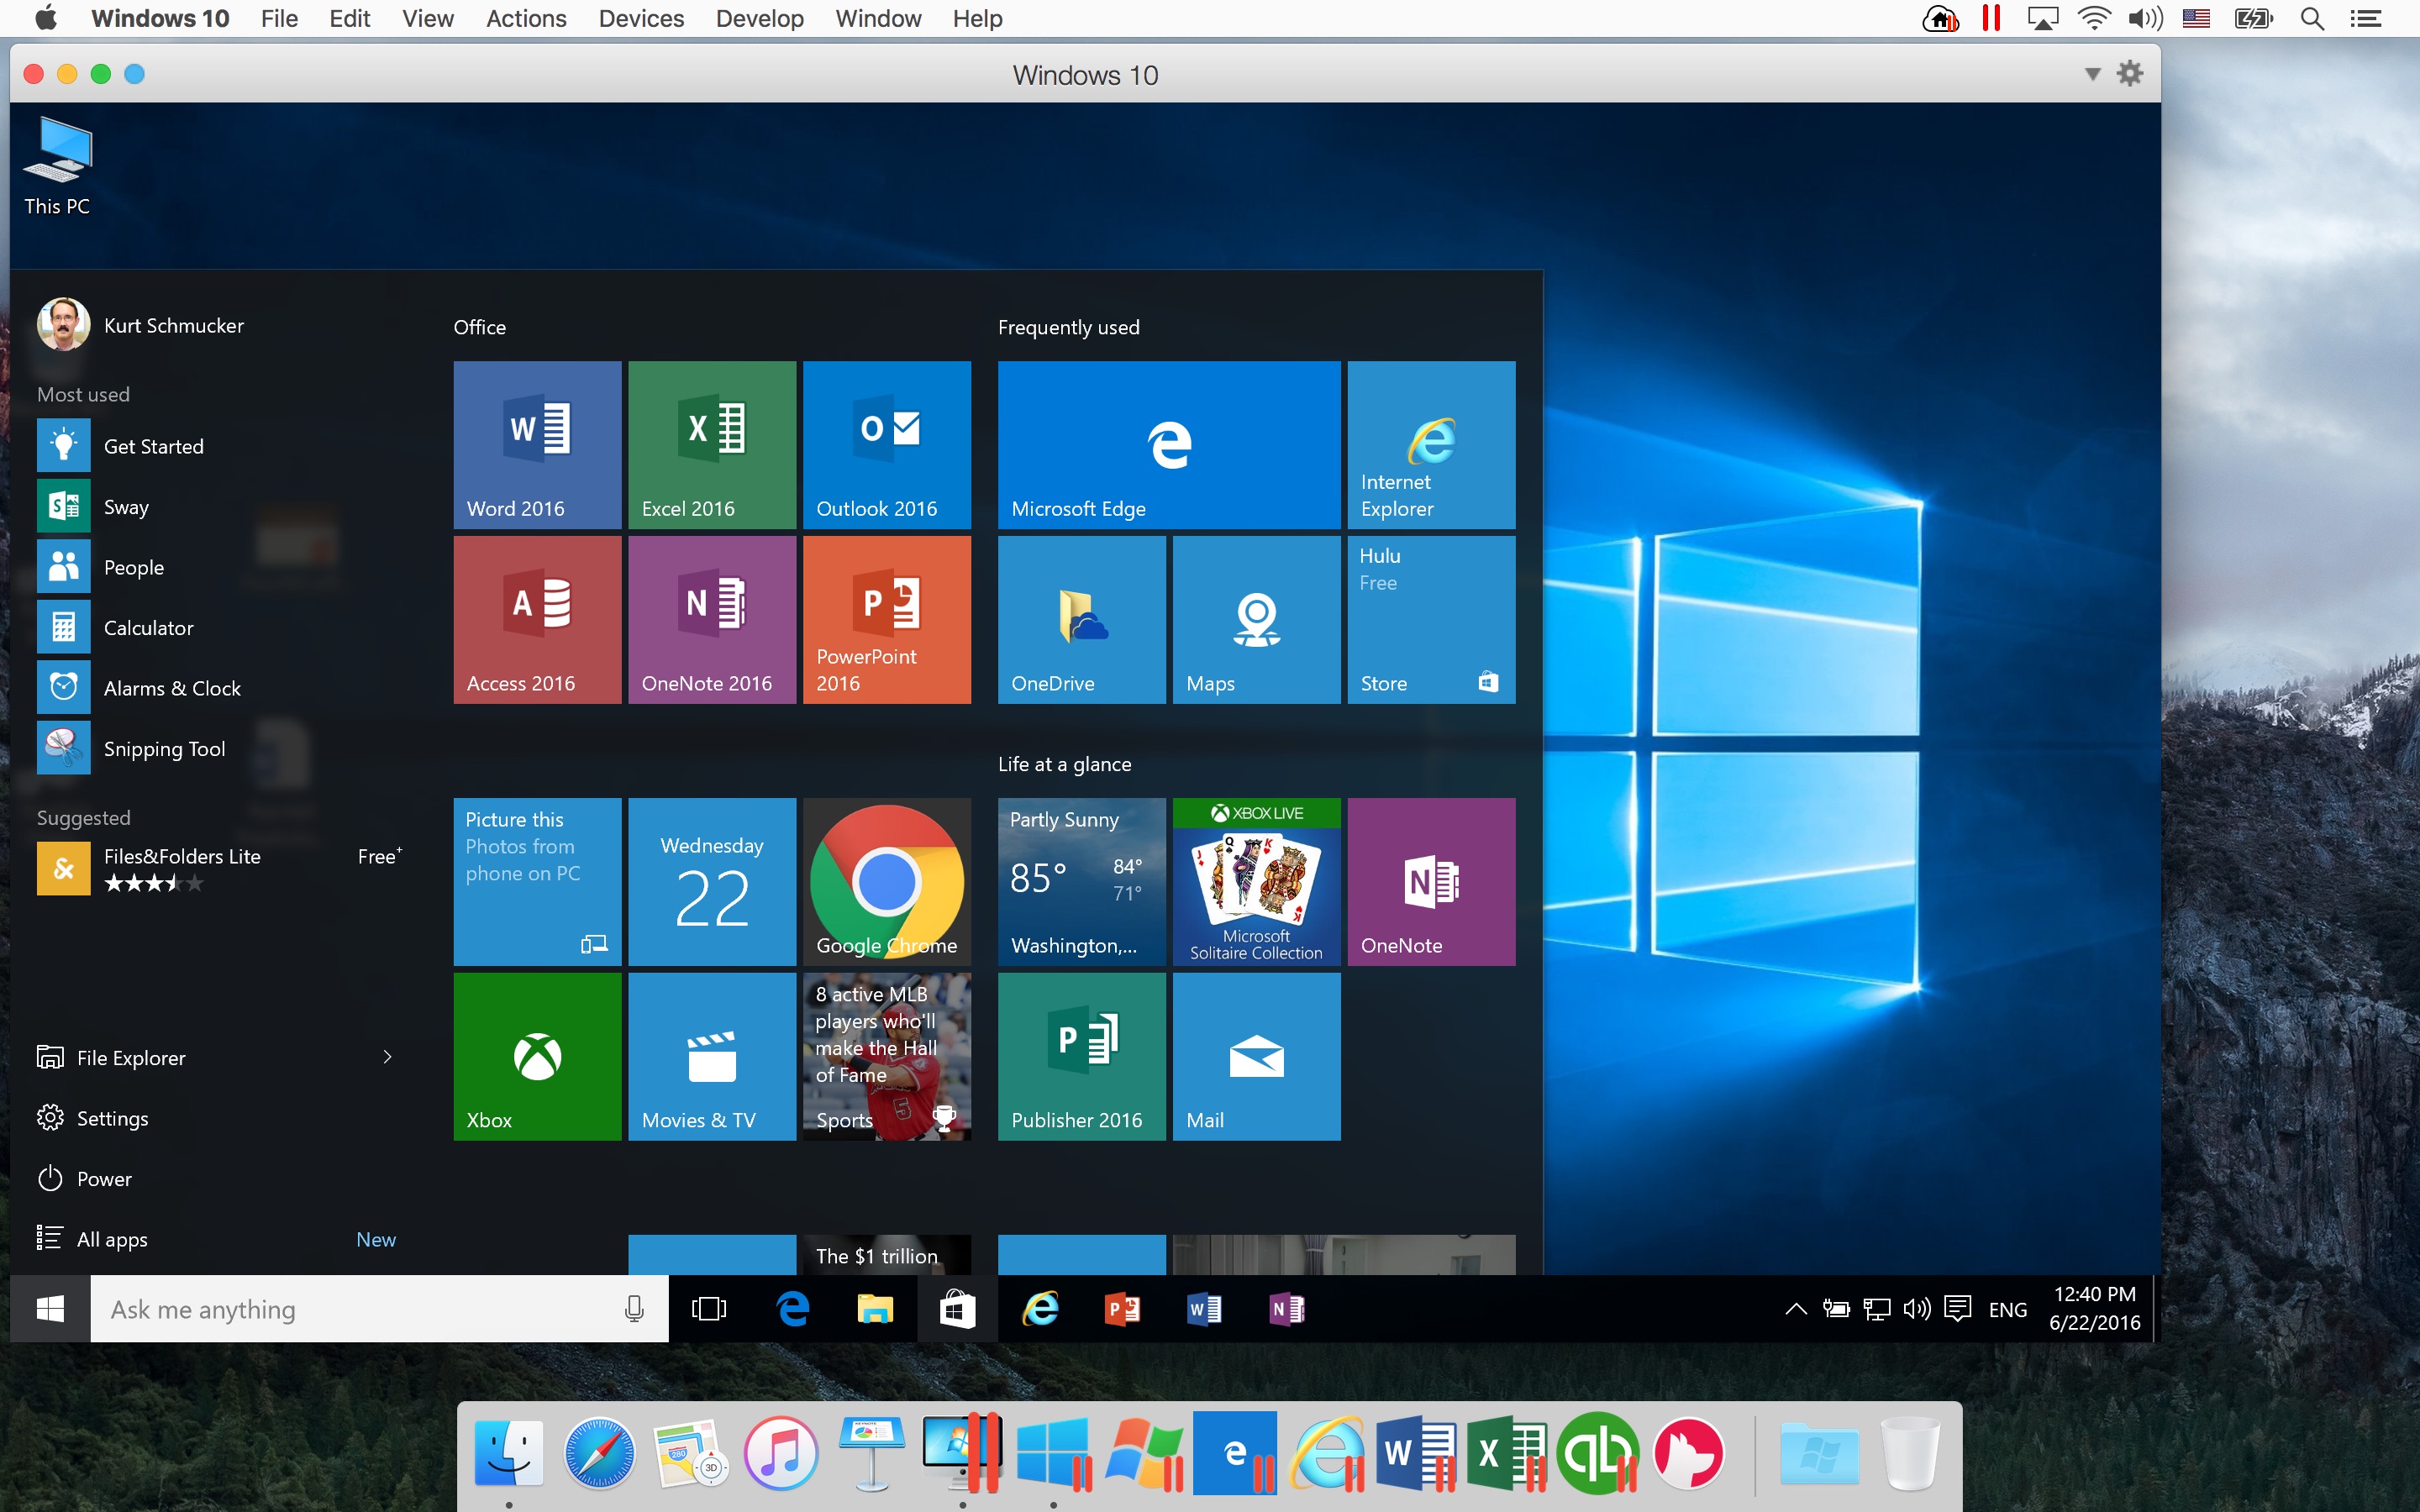
The most flexible way to install Windows 10 on a MacBook comes from Parallels. Their latest version Parallels Desktop 11 now supports Windows 10. It’s a program that fools Windows into thinking it’s running on a Windows PC instead of on a MacBook.
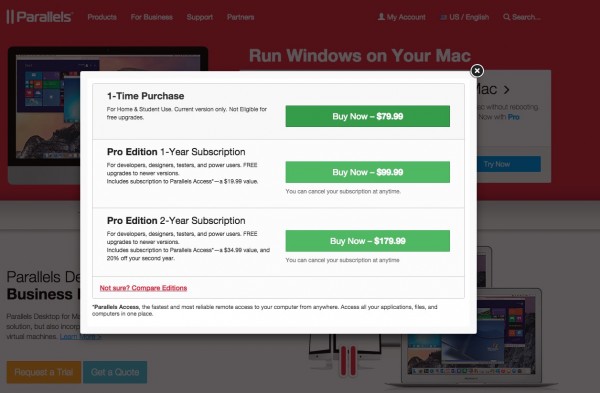
Parallels Desktop 11 doesn’t come cheep. Buyers can get it for $79.99. This works on one MacBook and they don’t have to pay every year to keep it running. Buyers will have to pay to upgrade to a newer version.
Parallels also offers a subscription for $99.99 per year or $179.99 for two years. Subscribers can download all upgrades to Parallels Desktop during their subscription period. The subscription also includes Parallels Access. This normally costs $19.99/year or $34.99 for two years. Parallels Access lets users remotely control their MacBook or a Windows PC from an iPad, iPhone or Android device. It’s a great way to run Windows software on an iPhone, iPad or Android device.
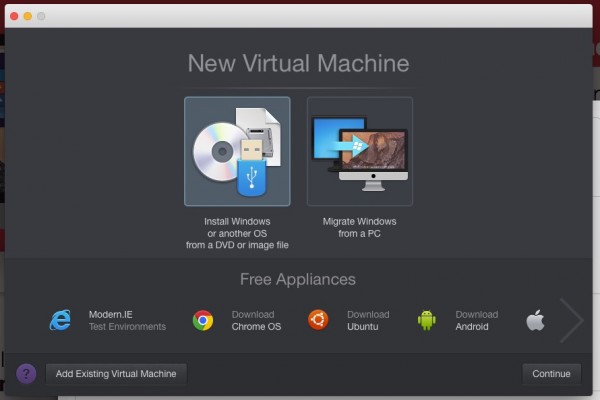
Install Parallels Desktop and open it to see the screen above. It’s a wizard that creates a new virtual machine. A virtual machine acts like a Windows PC, but uses the MacBook’s hardware to fool the operating system into thinking it’s a compatible computer. Virtual machines can run isolated installations of OS X for people testing software or they can run beta versions of the OS, Windows, Linux or even Android.
Choose Install Windows or another OS from a DVD or image file on the left in the center of the screen. Pick between installing from a DVD, an Image File or a USB Drive. If you downloaded a Windows 10 ISO file in the above step, then choose the center option Image File.
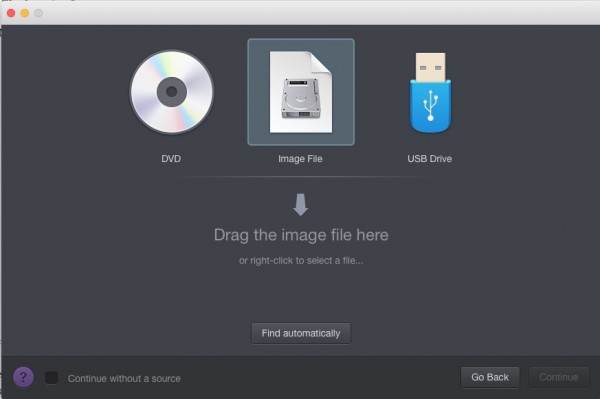
The wizard asks the user to drag the file from a Finder window to the center of the window. The user can also right-click the center of the window and find the Image file manually, probably in the Downloads folder. The program loads the file and asks the user to click Continue to finish creating the Windows 10 virtual machine.
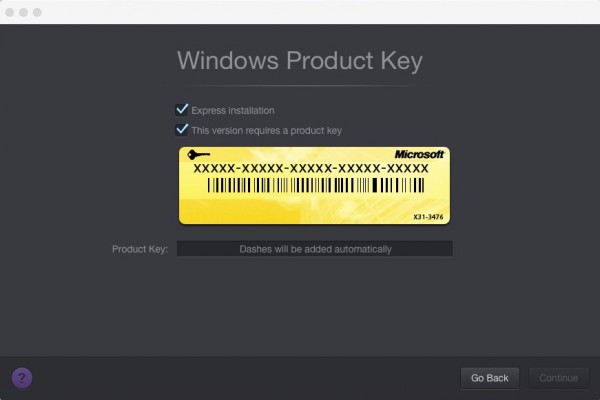
Enter the Windows 10 product key. If you don’t have one, you’ll need to buy one. The online Microsoft Store charges $119 for a download version or a USB version that will come with a key.
If you already own a copy of Windows 7 or 8 and can install it and activate it, then use that instead of Windows 10. Upgrade to Windows 10 after Parallels creates the virtual machine for Windows 7 or Windows 8, which it does for free on working installations of Windows 7 or Windows 8. That’s the cheapest solution, but it’s also the most complicated way to install Windonws 10.
Please see How to Update to Windows 10 Now
For the sake of this tutorial let’s assume the user owns a full copy of Windows 10 without the need for an upgrade from Windows 7 or 8.
Parallels asks how the installer plans to use Windows 10. It selects the best configuration options for the Windows 10 Virtual Machine. For example a person who plans to use the virtual machine for gaming will need more resources, like more RAM and processor power. Productivity users need less.
The basic version of Parallels 11 offers virtual machines for Productivity or Games only. The pro version also offers Software development, Software testing and Design. Pick one. Parallels explains these options in their knowledge base.
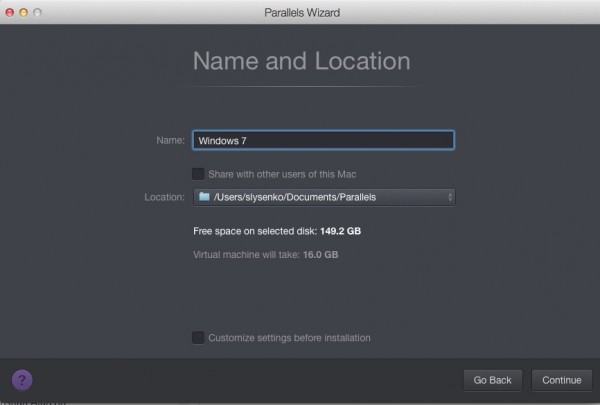
Type in a name for the virtual machine. The one above labels it Windows 7. If you’re installing Windows 10, use that even if you’re installing Windows 7 or 8, so you can then upgrade to 10 for free. Choose the location where Parallels will create the virtual machine on the local drive. Use a fast drive for this, like the internal SSD if there’s room or a fast external USB 3.0 drive.
Notice the option to Customize settings before installation at the bottom of the screen. Advanced users can check this box before clicking Continue.
This customization option lets the user pick how much hard drive space to use for the virtual machine or how much RAM it will use. The Windows 10 virtual machine will share the system’s RAM. Don’t make this too big or it will slow down the MacBook.
Click Continue. This begins the installation process.
When Parallels finishes installing Windows, it will try to install something called Parallel Tools. Let it complete this process or else Windows won’t run well.
OS X Boot Camp for Dual-boot Windows 10 and OS X
A second solution installs Windows 10 on a MacBook using a dual-boot configuration. Launch the Boot Camp Assistant found under Applications and Utilities on the MacBook or search using Spotlight by hitting the COMMAND+SPACEBAR key combination. Type Boot Camp. It shows as the first option.
Look at Apple’s excellent help page for the details about Boot Camp. There’s even a Windows 10 specific article explaining more.
Boot Camp comes pre-installed on every MacBook. It creates an installation disk from the Windows 10 ISO file and a collection of drivers that it downloads from Apple.
As with Parallels Desktop, the user will need a full working copy of Windows 10 or will need a working copy of Windows 7 or 8. Install it first and then take advantage of the free upgrade to Windows 10. See the steps for performing a fresh install or for performing an upgrade at Apple’s site.
Codeweavers Crossover Mac
A third alternative doesn’t install a full copy of Windows 10. Codeweavers makes a tool called CrossOver Mac ($59.95 direct) that runs Windows programs as if they’re Mac programs. Here are a few benefits of this option over the other two.
- It’s cheaper than buying Parallels 11 and Windows 10.
- It’s simpler than installing a full virtual machine when all you need is one or two programs.
- It takes up less hard drive space than either of the other two options.
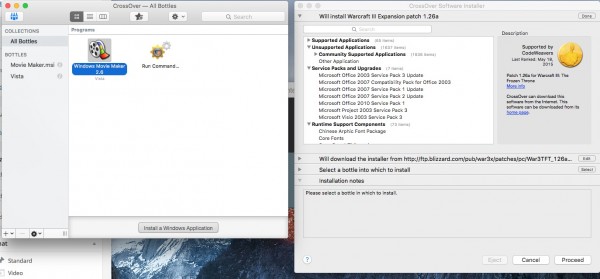
To get started open CrossOver Mac and click on Install a Windows Application. In the top section under Select an application to install we get a few lists.
- Supported Applications all come with CrossOver support, meaning the company knows they work without many problems. The program includes known working download links in the install wizard. This is the best option, so look here first.
- Unsupported Applications shows Community Supported Applications. Look under Community Supported Applications second. If it’s not listed under there, then choose Other Application.
- Service Packs and Upgrades shows just a few Microsoft service packs for things like Office, Project or Visio. Don’t worry about this list unless a program installed needs one of these components.
- Runtime Support Components lets people add things to support their applications installed using CrossOver. Don’t worry about this list either, unless a program installed needs one of these components.
Click on Done after choosing the application or after choosing Other Application and pointing the program to the installation file on the MacBook.
The next section points the program to the installation file. If one of the supported applications is chosen, then it enters a URL address to download the application automatically. You can ignore it if you picked from the supported programs. Otherwise, click on Edit and choose the source from local hard drives or folders. Then click Done at the end of the bar showing the source location.
Click on the bottle from the next section. A bottle is like a virtual machine in Parallels Desktop. Give the bottle a title and click on Done. Click on Install to begin installing the program. CrossOver will begin installing the program. The user will need to follow the setup installation wizard to finish it. After it completes the installation, click on Done to end the installation.
The CrossOver window shows all the installed bottles. Double click one to run it. It takes longer to launch a CrossOver program than it does to launch one natively in Windows. Most of the time it works quickly enough. CrossOver Mac also puts a link in the Applications folder on the MacBook. Run it like you would any other Mac app.
Related Posts
-
Parallels helps Mac users run virtual machines with other operating systems like Windows, Linux and…
-

On August 2, 2016 the Windows 10 Anniversary Update came out with some cool new features…
-

Microsoft’s Windows operating systems let users do a lot of things. Every day, machines loaded…