The Windows 10 Start Menu looks a lot like the one that came with Windows 8, but it’s a big departure from the Windows 7 and earlier Start Menus. In this round-upwe’ll show users how to master their Windows 10 Start Menu with ten awesome tips so you can get control of their Windows PCs like professionals.
Microsoft made a video showing some of the tips and tricks in this article. They include a few tips that we didn’t.
Windows 10 Start Menu Resizing
Windows 10 users don’t have to settle for the default size of their Start Menu. They can change the Start Menu in one of a couple of ways. First, users can make it fill the entire screen. Second, they can drag and drop to make it larger or smaller than it now is, even if it doesn’t fill the entire screen.
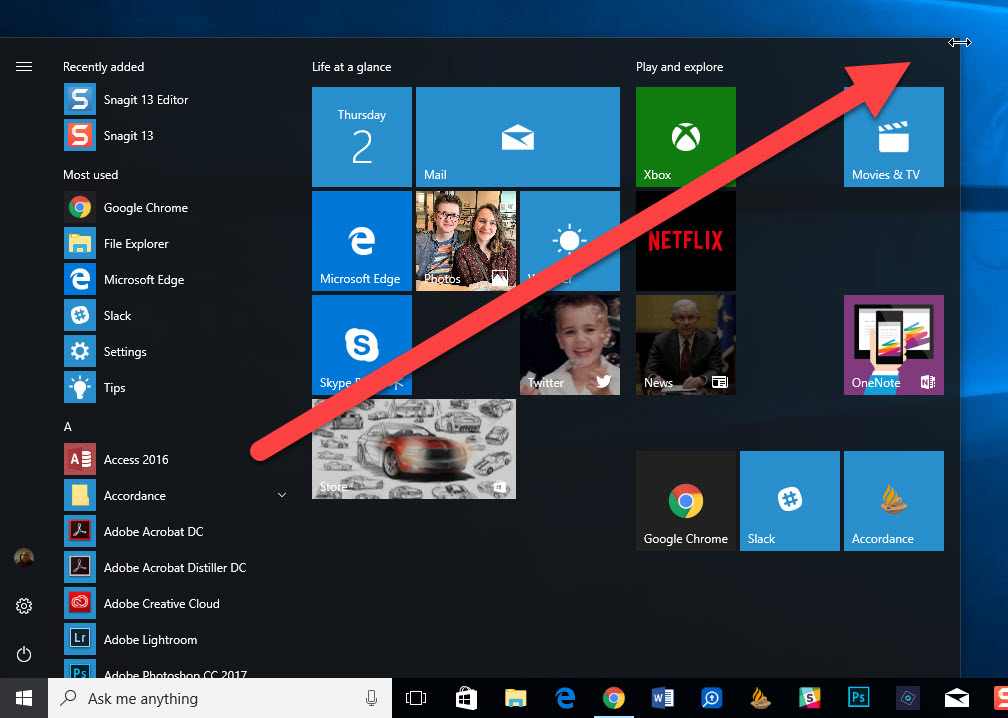
Open the Start Menu by clicking on it from the lower right corner or by using the Windows key on your keyboard, if it has one. Then move the mouse cursor over the edge of the Start Menu. You can see the way it changes in the image above. Now drag to resize it. You can drag from the sides or the top of the menu area.
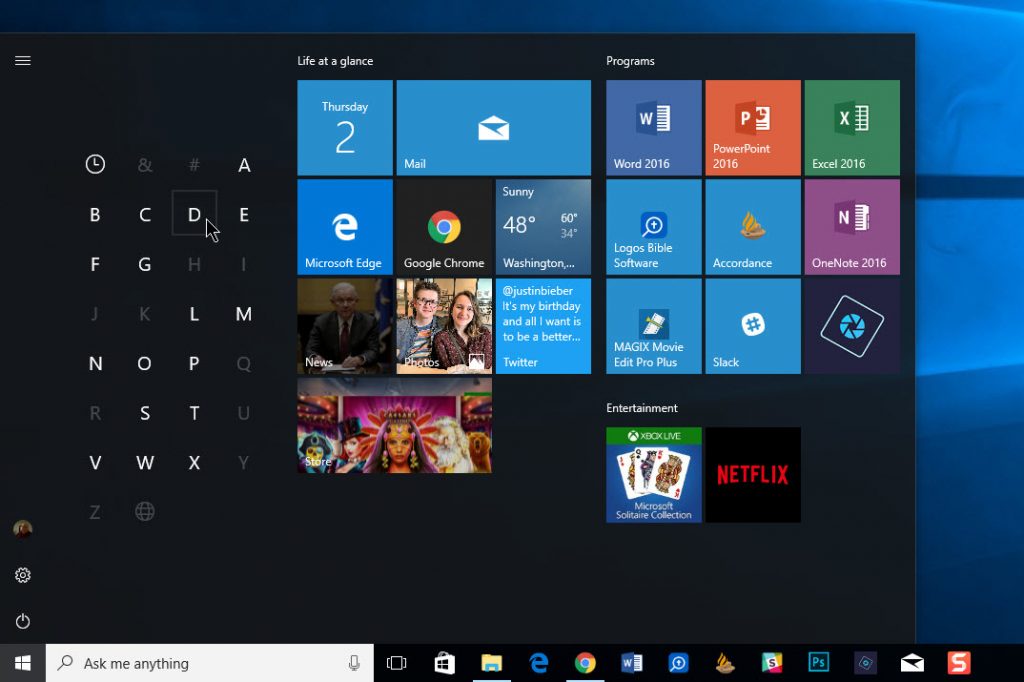
Windows 1o Start Menu in Tablet Mode
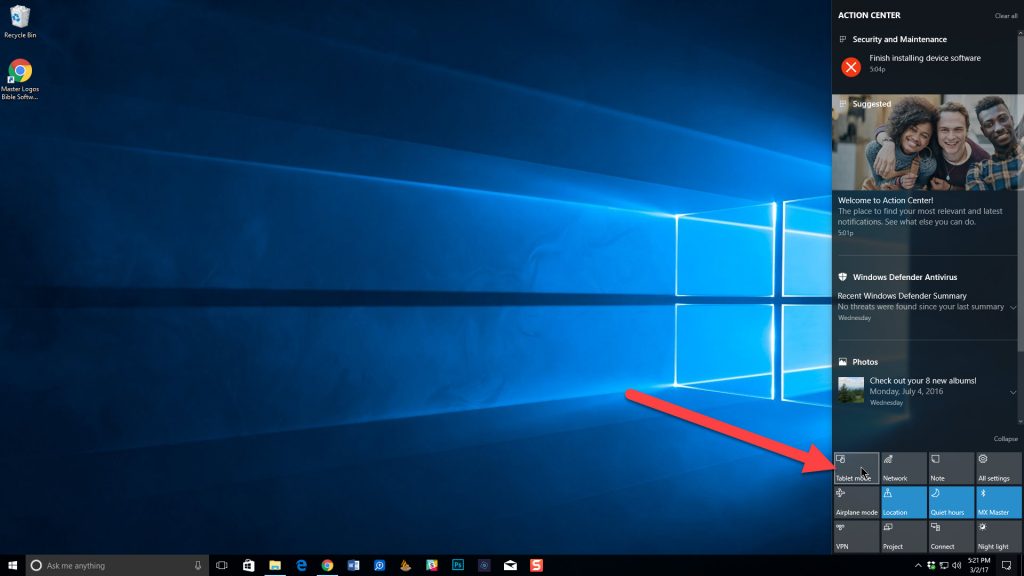
Users might prefer to make the Windows 10 Start Menu fill the screen. Do this by changing the PC into Tablet Mode. Open the Action Center by clicking in the small box that looks like a quote call out in the lower right corner of the screen. The Action Center opens and probably includes a button at the bottom of the Action Center that says Tablet Mode. Click on it and the Taskbar changes so that all of your program icons disappear. However, your Start Menu will now fill the screen when you click on the Windows button or press the Windows key on the keyboard.
If you don’t see the Tablet Mode button in the Action Center, then you can turn it on by opening All Settings from the Action Center or from the Start Menu. You’ll find Settings two icons above the Windows button when you click it. You can also right-click on the Windows button and choose Settings.
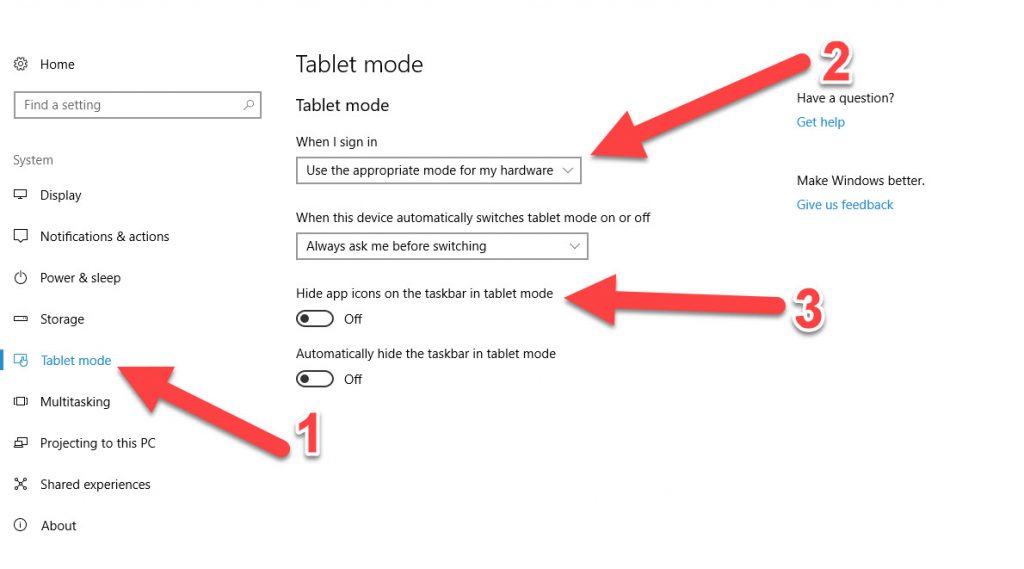
In the Settings screen, click on System. Then click on Tablet Mode (#1 above). In the Tablet Mode settings screen click on the first drop down box under the phrase When I sign in (#2 above). Choose Use Tablet Mode that the system always opens up with the full screen Start Menu showing.
While in Tablet Mode, the taskbar changes hiding the pinned program icons. You can get them back by turning on the switch under Hide app icons on the taskbar in tablet mode (#3 above).
Quickly Open System Tools Using Right-click on Start Menu
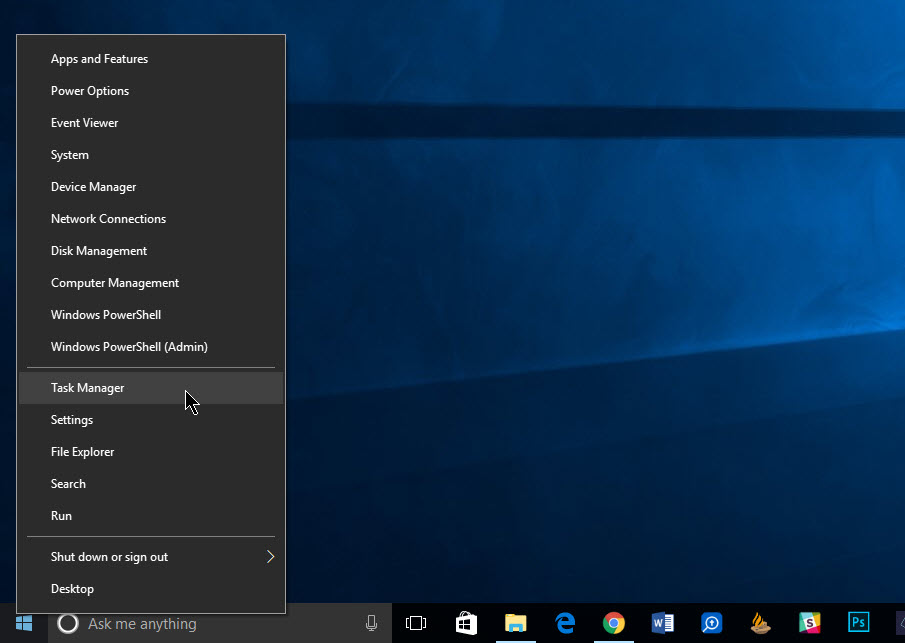
As we mentioned above, you can quickly open a list of system tools using the right-click action on the Start Menu Windows button in the lower left corner. Here’s a list of the available tools:
- Apps and Features – opens the Apps and Features settings including a list of currently installed apps and programs that the user can uninstall. It also includes a place to turn on or off optional Windows 10 features.
- Power Options – change any power features like how quickly to turn off the computer or when to go to sleep.
- Event Viewer – shows event logs, which let advanced users know more about what’s happening if there’s a crash or system problem.
- System – shows information about the system, like the name the PC shows on a network or installed RAM and more.
- Device Manager – shows the devices installed on the computer and lets the user work with device drivers.
- Network Connections – network connection settings.
- Disk Management – lets user see what drives the computer has installed and lets users work with drives so they can format them or partition them.
- Windows PowerShell – like a command prompt that lets users run powerful scripts. Users should not use PowerShell unless they know how to use it properly since it could mess up their system.
- Windows PowerShell (Admin) – same as above with administrative rights.
- Task Manager – shows details about programs running and features in Windows running in the background where users can actually see them. Take a look at the Startup tab to see programs that run each time you start your computer. They can slow down the computer and you may want to remove them from the list.
- Settings – a central place for all the important Windows 10 Settings, like adding or removing devices, updating Windows, personalizing the look and behavior of the OS and more.
- File Explorer – opens the Windows File Explorer so you can work with your files.
- Search – lets you search your computer and more using Cortana.
- Run – lets users run programs using the program file name.
- Shut down or sign out – fly out menu that shows a new menu listing the following:
- Sign out – sign out of the current user account but doesn’t shut down the system.
- Shut down – shuts the computer down and turns off.
- Restart – restarts the computer.
- Desktop – hides all open windows and shows the Windows Desktop.
Use Alphabetical Program Lists
People with a lot of programs on their computer might struggle to find them. When you open the Start Menu, there’s a list of programs along the left and they’re organized into three groups. There’s Recently added, Most used and the alphabetical listings under each letter of the alphabet.
You may not want to scroll down a long list of programs to a piece of software that begins with the letter T. Just lick on the section label, like Recently added, Most used or the A in the group of programs that begin with the letter A. You’ll see all the letters of the alphabet. Click the letter T and it jumps to that grouping of programs that all begin with that letter.
You can go back to the list by clicking on the icon next to the letter A that looks like a little clock.
Turn Live Tiles On or Off
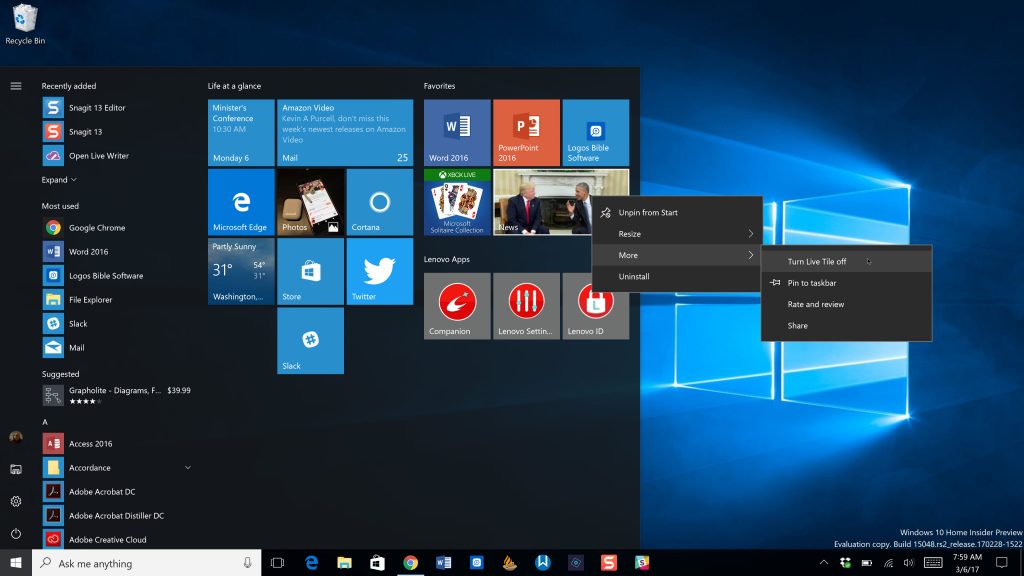
Live Tiles offer a cool feature in the Windows 10 Start Menu. They show information in real-time like sports scores, news updates or live weather. However, people may want to turn them off and then later turn them back on. It’s simple to do. Open the Start Menu using the Windows Start button in the lower left corner or with the Window keyboard button. Find the tile you want to change and right-click on it or long press with your finger. If you right-click a pop up menu shows up. Click on More and then Turn Live Tile off.
Long press with your finger on a live tile to show the two controls and tap the lower control.
If you long press with your finger, two controls show up. Tap on the one with three dots in the lower right corner of the live tile to show the pop up menu and then tap on More and Turn Live Tile off.
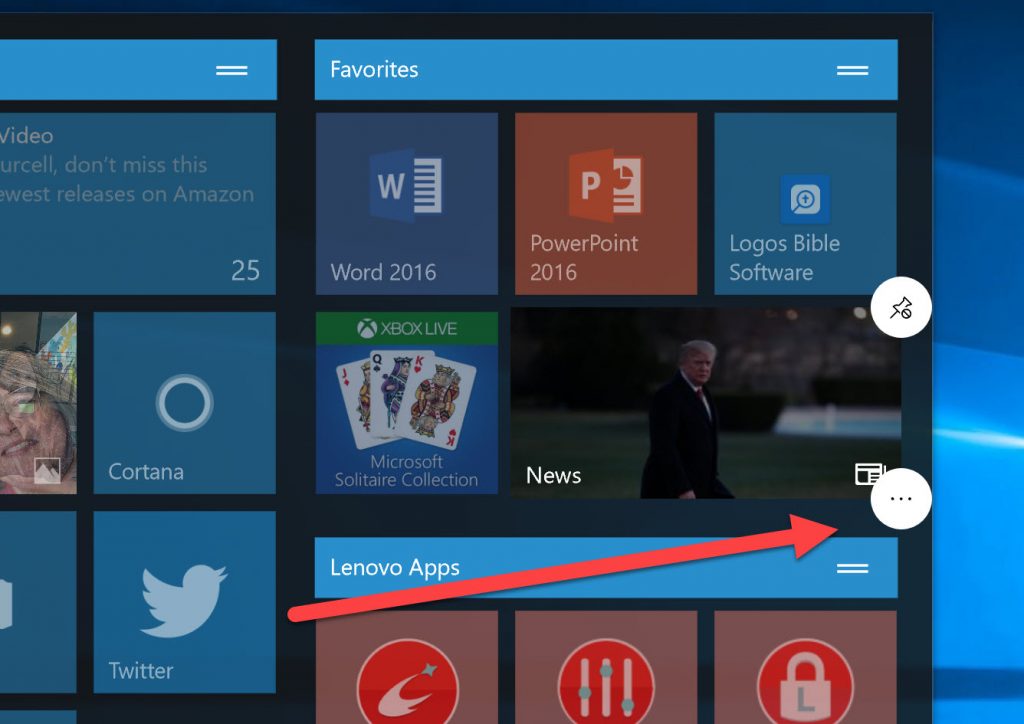
Rearrange Tiles on the Windows 10 Start Menu
Move the Windows 10 Start Menu tiles around to arrange them the way you want. Drag and drop each tile to put them where you like.

I like to arrange my Start Menu tiles by groups. For example, I put all the apps for my laptop manufacturer that I use in one group. I have a group for creative apps and another for Favorites. Just drag those tiles into a group. Play around to see how they behave as you drag and drop them.
Resize Tiles on Windows 10 Start Menu
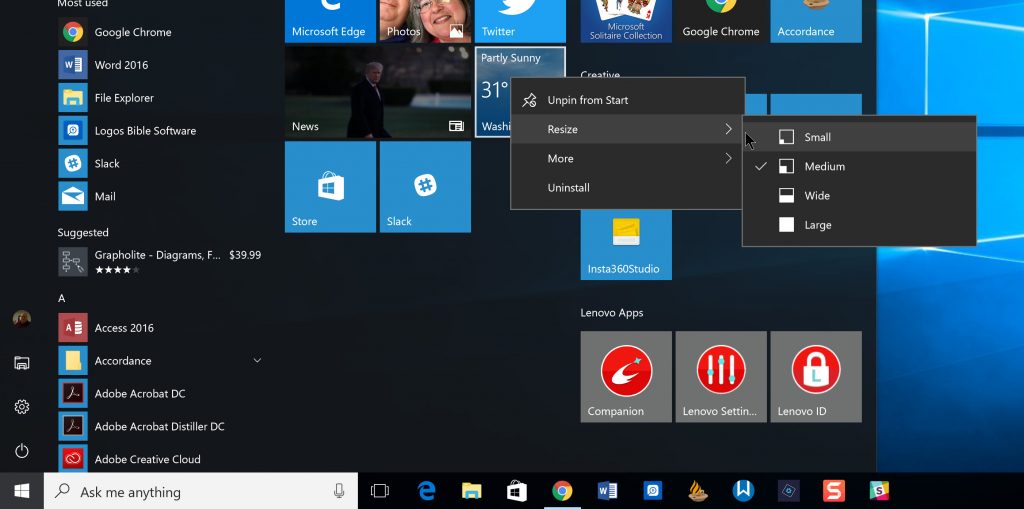
The tile arrangement on the Windows 10 Start Menu can change depending on the user’s preferences. Sometimes it’s helpful to change the size of tiles to arrange them more effectively. To do this, right-click or long press the way you did above to turn Live Tiles on or off. Then, choose the menu item labelled Resize and then pick one of the sizes.
Not all tiles will show all four of the sizes. Also, Live Tiles won’t show live content when you resize the tile too small.
Open Recent Files from Tile Right Click Menu

One of the cool features of tiles shows a list of recent files opened in a program. For example, the Microsoft Office tiles show a list of recent files open by the various Office programs.
To show the program’s list of recent files, open the Start Menu and then right-click on the tile of the program. The list shows up at the bottom of the pop up menu. Click a file to open that program with that file open. Hover over the file to see a pop up that shows the place on the Windows hard drive.
Uninstall Apps and Programs from the Start Menu
The Windows 10 Start Menu lets uses uninstall programs and apps from the menu. To do this, right-click on a tile and choose Uninstall from the pop up menu. You can also find the program from the alphabetical list of programs on the left side. Right-click the name of the program from the list and choose Uninstall.
Pin and Unpin Programs to the Start Menu
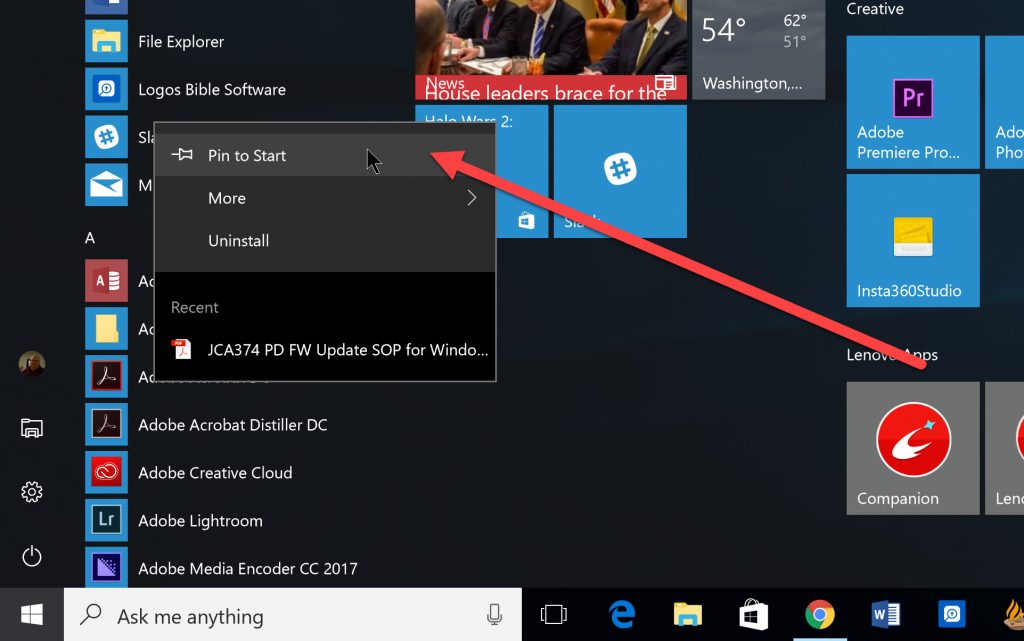
If you want to add a program to the Windows 10 Start Menu, then find the program in the list on the left side of the Start Menu and right-click it or press and hold till the context menu pops up. Choose to Pin to Start to add it to the Start Menu. You can then drag and drop it where you want on the menu or change the size of the tile using the steps mentioned above.
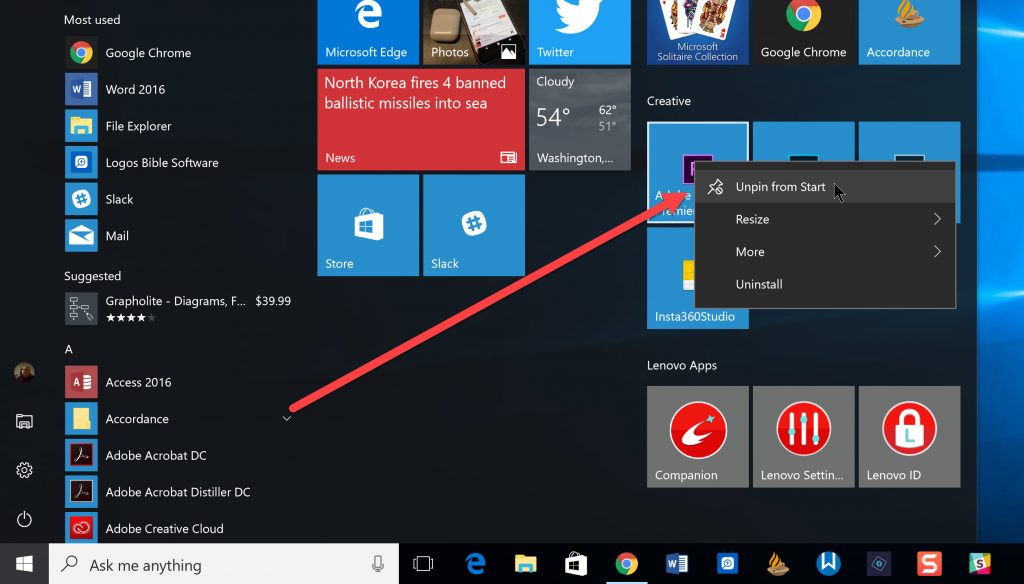
You may want to remove some programs on the Start Menu. Right-click or press and hold the tile. Choose Unpin from Start from the context menu that pops up.
Related Posts
-

Microsoft’s Windows operating systems let users do a lot of things. Every day, machines loaded…
-

Even though Windows 10 has made upgrading Windows easier than ever, sometimes you still need…
-

On August 2, 2016 the Windows 10 Anniversary Update came out with some cool new features…