This guide is part of a week-long series we’re calling Google Voice University, which will take you from a beginning Google Voice user all the way up to a Pro in a series of short guides.
Basic Uses:
The most basic use of Google Voice is to ring more than one phone at a time, receive voicemail as an email or listen to it on your computer and setting do a do not disturb time.
Set Up Google Voice to Control your Cell Phone’s Voicemail:
If you aren’t switching every contact over to your Google Voice number right away, you can still enjoy the benefits of having Google handle your voicemail by connecting your cell phone’s voice mail to your Google Voice account. You cannot do this with landline phones, only those Google recognizes as a mobile phone number.
Step 1: Go to your Google Voice Settings page by clicking on settings and choosing “Voice settings” in the upper right hand corner of your Google Voice home screen.
 Step 2: On the Phones tab look for a link that says, “Activate Google voicemail on this phone”. Click it.
 Step 3: If Google identifies your cell phone company correctly, you just need to dial the number it shows and you will begin sending your missed calls to Google Voice instead of the clunky system used by AT&T, Verizon and others.
Add a New Phone:
If you want Google Voice to ring all your phones you’ll need to add another phone. You can do this from the same Phones tab by looking for the “Add another phone” link at the bottom of the page.
Step 1: Give your phone a name and enter the phone number.
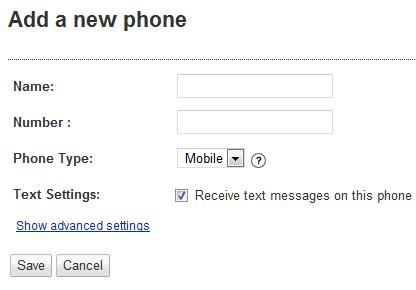 Step 2: Choose your basic settings such as phone type and whether it should get text messages. You can then “Show advanced settings” to control access to voicemail and configure this phone to ring on weekends or weekdays. This is great for configuring a phone not to ring when you are relaxing.
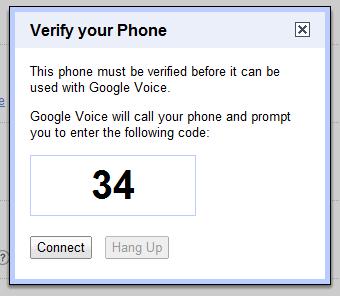
 Step 3: Verify the phone with Google Voice, just like you did the first time you added a phone during sign up. You can repeat the following steps until you have added all of your phones; then we will look at how to choose which phones to ring.
Choose which Phone(s) to ring:
Next up we want to show you how to choose which phones to ring. While you can have all phones ring all the time, you may want to not have your hoe phone ring while you are away from home since a spouse or kid could answer the phone and you wouldn’t be reached. This happens on the same phone screen as before, and is accomplished with a single check mark.
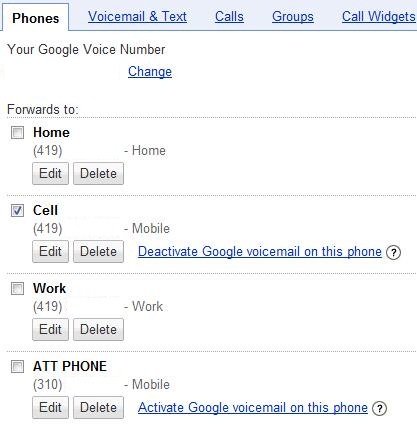 In this case you can see that my cell phone is the only phone that will ring if you were to call my Google Voice number. If I want it to ring my office phone or hoe phone all I need to do is click on the box and it is instantly turned on.
How to turn on Do Not Disturb:
Another cool feature is the ability to set a Do not disturb option that will send all of your calls and text messages to voicemail so that you can get work done or enjoy a day without any phone calls from anyone.
Step 1: From the same Settings page click on the Calls tab at the top. The second to last option is to Enable “Do Not Disturb. Check the box.
Step 2: Now that you have checked the box you are on Do Not Disturb until you make a change. You can also set the do not disturb time to end in a set number of minutes, hours or days by changing the settings.
How to Change your Voicemail Greeting:
The easiest way to record your voicemail greeting is to use go to the Google Voice settings page and click on the”Voicemail & Text” tab. Here’ you will be presented with several options to record your name and your voicemail.
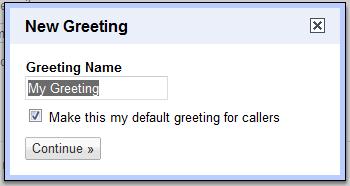
Step 1: Click Record New, name the greeting and leave the box checked to make it your default.
Step 2: Choose a phone for Google Voice to call so that you can record your message.
Step 3: Record your message and listen to it.
Voicemail Notification:
Now that you have Google Voice controlling your voicemail, you may want to receive email alerts or text message alerts when you have a new message. You can control this by clicking on the “Voicemail & Text” tab and looking for the options shown below. When you have the check boxes where you want to make sure you click save at the bottom of the page.
Text Message Forwarding:
When you add a phone you can choose to have text messages forwarded to that phone, but if you prefer to have your Google Voice text messages sent via email you can choose to do that as well. In the same Settings page we have been using click on the “Voicemail & Text” tab. All you need to do is click the checkbox next to “Text Forwarding” and your texts will be sent to your email for easy responding. Make sure you click save at the bottom of the page.
Learn More:
This is part of Google Voice University, a week-long look at how to use Google Voice. This second lesson is a look at the basic settings and tomorrow we will cover how to use Google Voice rules — by the end of the week you’ll graduate with a masters in using Google Voice.

