MacBook users need to back up their hard drives full of pictures, documents, media files and more. Apple includes a couple of tools within OS X that help with Mac backup, but users may want to consider some third-party tools as well. We’ll round-up the best Mac backup options to help you. These include Time Machine, which Apple builds into every Mac with OS X. Users can also backup selective data with things like iCloud, manual backup or file syncing services. Third parties also offer complete and partial backup solutions.
A few of these solutions will include opening System Preferences. To do this, do one of the following:
- Click on the Apple icon button in the upper left corner of the screen and choose System Preferences.
- Click on the gray and black gear icon from the Dock (on the right end by default). To make sure you’re selecting the right one hover over the icons till the label System Preferences pops up over the mouse cursor.
- Use the keyboard shortcut COMMAND + SPACE and type Sys then hit Enter.
Remember to follow the 3-2-1 Mac Backup strategy. That equates to 3 copies of your data on at least 2 kinds of media with at least 1 offsite backup. The three copies will include the one on the computer, one on the local backup media and one in offsite backup like the cloud or a drive that you put at another place. The following solutions will help you follow this rule.
Time Machine
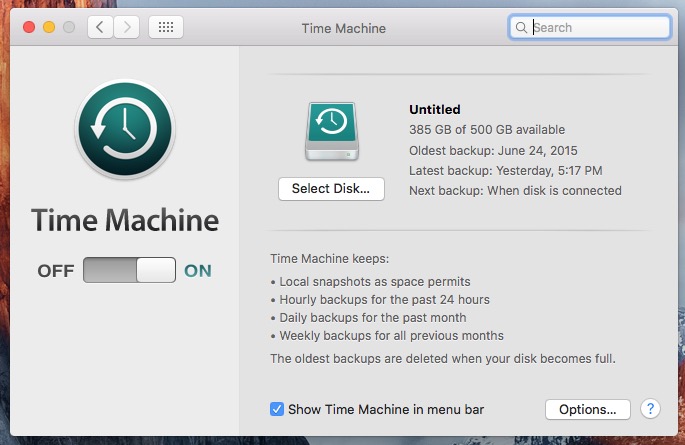
Apple includes Time Machine as part of OS X making it possibly the simplest Mac backup option. Connect a hard drive and turn it on. The utility backs up everything on the Mac to the external drive so that users can get their files back if they lose them or if the computer stops working, gets lost or stolen.
We’ve got a great Time Machine How To article already. To summarize, follow these steps:
- Open OS X System Preferences using the steps above.
- Click on Time Machine in the last row on the right end.
- Click the On/Off button so it turns On.
- Click on Select Disk to choose the external drive you wish to use for backup and then OK to close the dialog box.

The box that pops up when the user clicks the Select Disk button offers the option to choose a disk connected to the Mac or the person can choose an AirPort Time Capsule. Apple sells two sizes ($300 for a 2TB option and $400 for a 3TB Time Capsule). The Time Capsule includes a hard drive and a network router with Wi-Fi and Ethernet. They’re simple to set up but don’t offer as many features as most modern routers, most of which transfer data faster than Apple’s Time Capsule. You need to choose between simplicity or speed and features.
Since Time Machine doesn’t offer an offsite option, use one of the following as well.
iCloud
iCloud won’t back up everything on a drive like Time Machine, but it does back files up to the cloud. GottaBeMobile offers a great guide for using iCloud on Mac and iPhone, but we’ll focus on OS X and Mac backup.
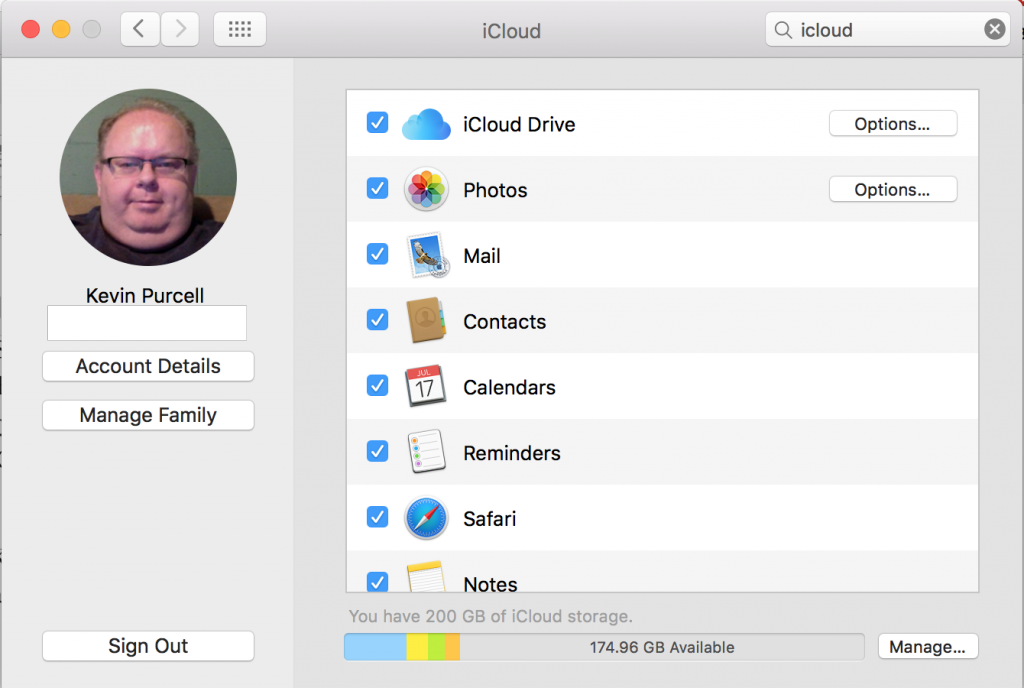
Set up iCloud by opening System Preferences. Click on iCloud, the first icon in the third row. The above dialog box will appear. Check off the kinds of data you want to back up. The article in the link above explains each of them in detail.
Every Apple user account comes with at least 5GB of free iCloud storage, but that will fill up quickly if the user plans to use it for things like photos or other media files. If you plan to use iCloud for all of your files and data, then consider buying more storage. It costs $2.99/month for 200GB or $9.99/month for 1TB. Click on Manage in the lower right corner. Then choose Change Storage Plan to buy more.
Other 3rd-party file syncing services also offer backup. See below for more on those.
Hard Drive Mirroring
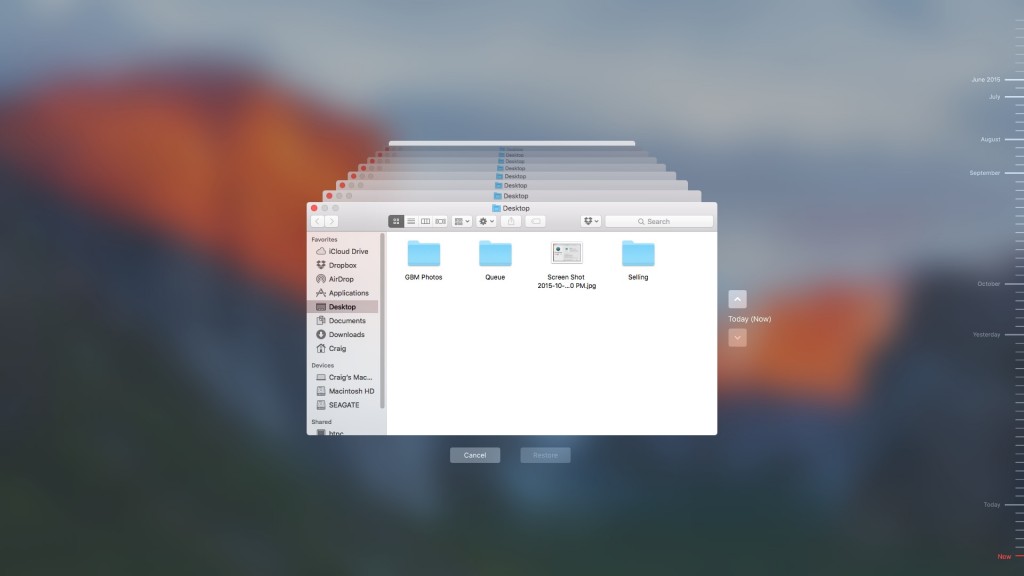
Time Machine is a great tool for Mac backup, but it’s not as powerful as making a mirror image or copy of the entire hard drive. If your MacBook hard drive fails, then you can plug in the second hard drive and press the OPTION button on your keyboard while booting the Mac. All the connected drives will appear and you can pick the external drive and boot to it to get your Mac up and running. Now you can use it to reformat the internal drive and then mirror the external drive back to the internal drive and you’re ready to go. You’ll only lose the data created since the last time you created the mirror.
The two most popular solutions for Mac backup include Super Duper and Carbon Copy.
Super Duper

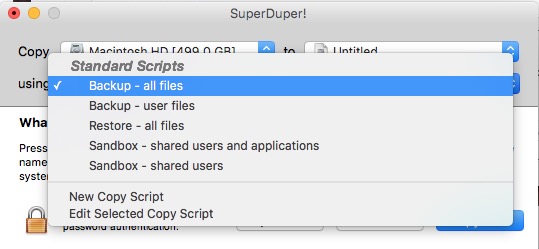
Super Duper comes from Shirt Pocket Software and costs $27.95 with a free trial version. It’s a simple program. It asks the user to point to their source drive in the first drop down box at the top of the SuperDuper app window. Select it from the drop down next to the word Copy. Then, choose the target drive in the second drop down box. After the program finishes the two drives will have the same contents.
SuperDuper lets users customize how files get backed up. There are a lot of features and some automation that makes it easy to set it and forget it. The program comes with a PDF file that does a great job of explaining its features.
The user can either Schedule the cloning of the disk for a later time or click on Copy Now to do it right away.
Super Duper is a simple, affordable solution that you can test before paying.
Carbon Copy Cloner
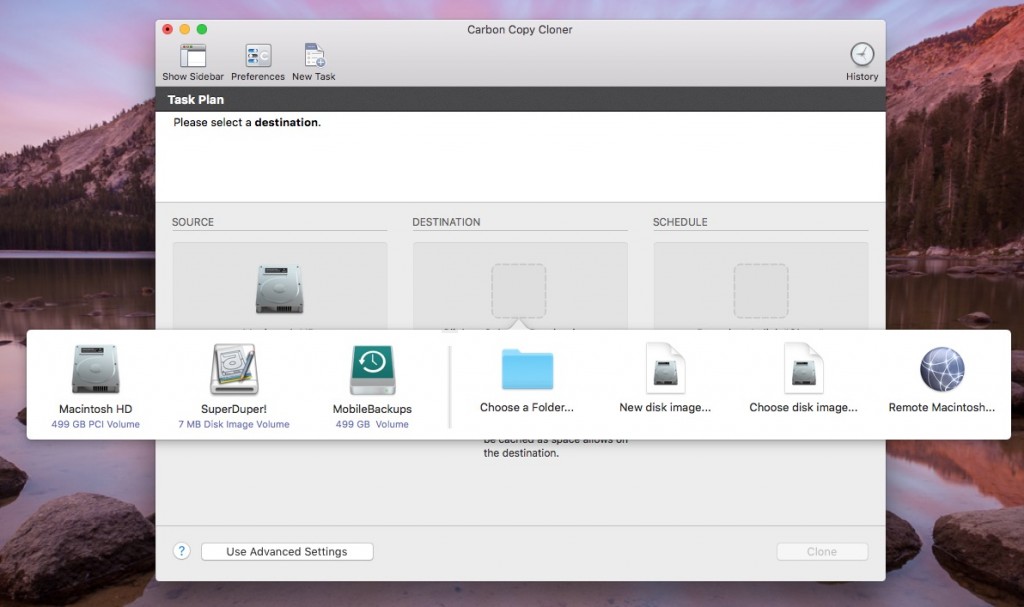
A slightly more powerful and polished program called Carbon Copy Cloner costs a little more than Super Duper. It works like Super Duper but offers a few more features for $39.95. Choose your source drive and then choose a destination drive. Set the user settings and click on Clone to start the process.
The program lets users select which files to copy. You either choose All files or pick Selected files.
If the user turns on Safety Net (a switch below the destination drive button), the program will protect files that the user deleted since their last backup as space allows. This protects those files on the destination drive without copying them back to the source drive of the Mac. This makes it possible to keep backups without cluttering the internal hard drive of the Mac.
Carbon Copy Cloner will also create image files of the drive. Users can customize how they receive notifications when the process completes: an email or using the OS X system notifications. The program also allows the user to schedule backups.
Mac Backup of Personal Files Only
Some people don’t want to take the time to do a full system backup. Since a person can reinstall their operating system and apps, the user only needs to backup personal files. It’s not the best approach, but it might make sense if…
- You don’t own a large enough backup hard drive.
- You use very slow Internet service and backing up to the cloud will take forever.
- Your Internet service provider limits the amount of bandwidth you can use in a month and full backups will eat that up quickly.
Forklift
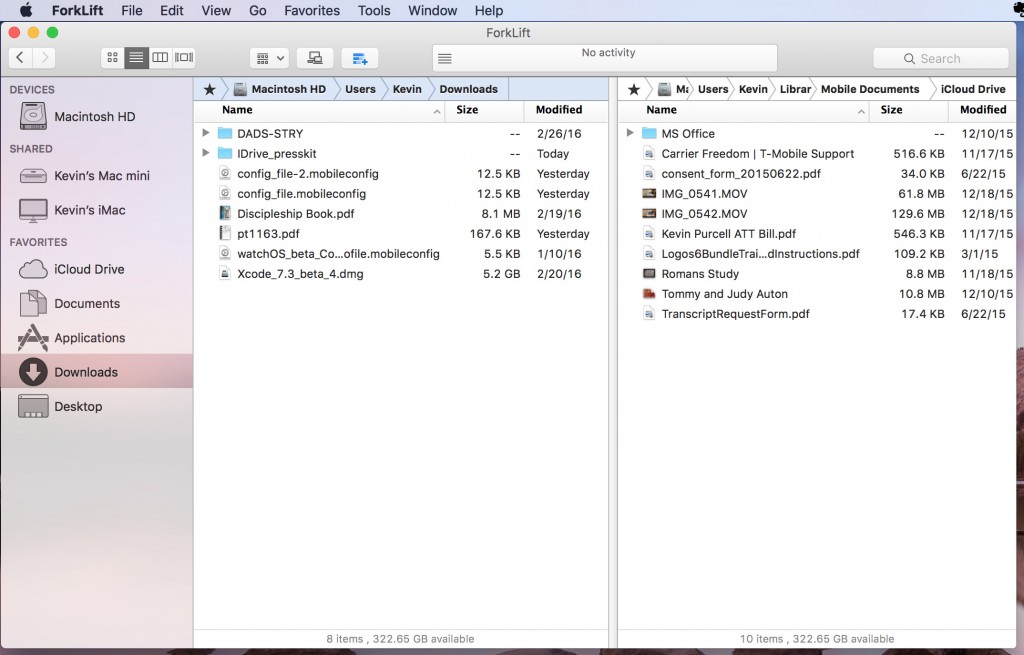
Get an app like Forklift ($9.99) a helpful Finder replacement. The app looks like Finder, but shows two panes making it easy to copy from one drive to another quickly. The program also includes the following features making it great for backing up files.
- Remote file access though FTP, WebDAV, Amazon S3, SMB and more.
- Folder Sync compares contents of two folders and syncs them so both folders always include the same files
- Synclets schedules syncs and runs them automatically.
- Conflict management controls whether to delete files when copying a similar file from one place to another.
- Create archives like ZIP files.
- Built-in file viewer so users can see what they’re copying (great for pictures and videos).
6 File Sync Solutions for Mac Backup
If you want to use a cloud backup solution for backing up just your personal files, consider using one of the great file syncing services. Here’s a list of the best file syncing options:
- OneDrive – comes with an Office 365 subscription so you may already have up to 1TB included
- Dropbox – most used by other apps and services and integrates with Microsoft Office
- Box – a large cache of free storage
- Google Drive – if you’ve ever bought a Chromebook you may already enjoy a 1TB of free storage
- SugarSync – one of the most feature-filled services with awesome sync apps and mobile apps, but it’s also a little more expensive
- iCloud Drive – you can still use it as a drive by storing files in the iCloud Drive folder on your Mac.
3rd Party Mac Backup Services
A 3rd-party cloud backup service that offers the most complete option, but it also costs more than most. Check out these popular services.
iDrive
iDrive is listed as a favorite among Mac users. It’s a comprehensive solution with some awesome features. This makes it the best option in the roundup for those who don’t mind paying for a solid 3rd-party cloud backup service.
iDrive offers a free 5GB account for people who don’t want or need to back up everything. This makes it more like the above file syncing services. A 1TB option costs only $60/year, but they’re running a sale for $44.62. The 10TB option is for hardcore users with multiple machines to back up and costs $500/year or about $375 on sale.
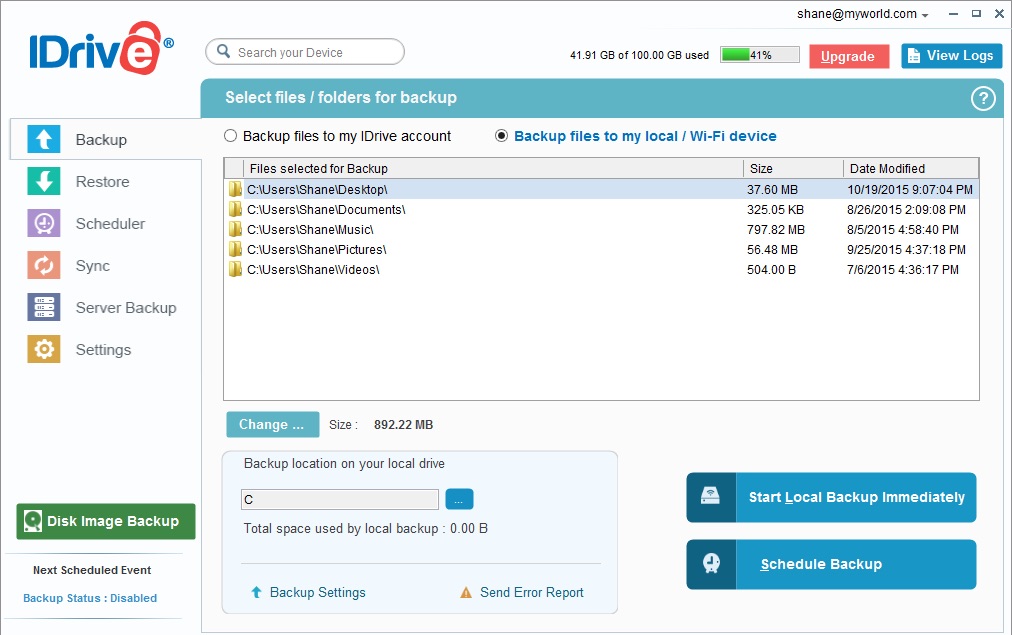
The iDrive app shows a column along the left with buttons for each part of the utility.
- Backup – use this to start backups either to a local drive or over Wi-Fi or through the Internet to the iDrive servers.
- Restore – when you need to put a file back in place after loss, use the Restore section.
- Schedule – this schedules backups. Tell the program to do all backups at night or during the part of the day when the computer’s not in use but turned on.
- Sync – syncs files stored in a special folder under your main user folder. Each computer set up with iDrive will sync the folders in this special folder. It works like Dropbox or Sugarsync.
- Server Backup – for backing up web sites and only shows up in the business versions.
- Settings – change the utilities settings.
In the above screen shot, notice that iDrive offers iDrive account backup and local backup. The first backs things up through the Internet to the iDrive cloud servers. The second option does the Mac backup to a local drive: an external drive or a network attached drive. Users can also pick an iDrive Wi-Fi backup drive like the one offered by iDrive for $100 (1TB) or $150 (2TB). Connect it to your network and backup over Wi-Fi.
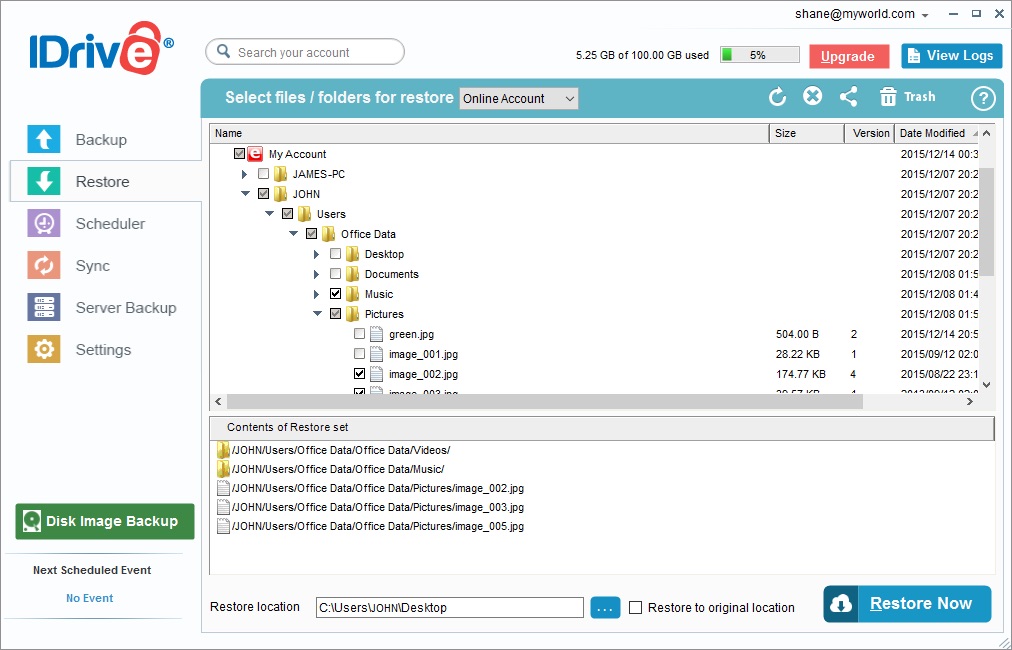
Use the Restore button on the left to get the backup files from the cloud. It lets you select specific files or folders and chose to either put them back where they were originally or you can download them to a different spot, like your Mac Desktop. Do this if you want to put it back in place manually.
iDrive offers a few features that make it a great tool. For example, remote backup control through their website and mobile apps so you can reach your files from anywhere. The apps also backup phone or tablet content.
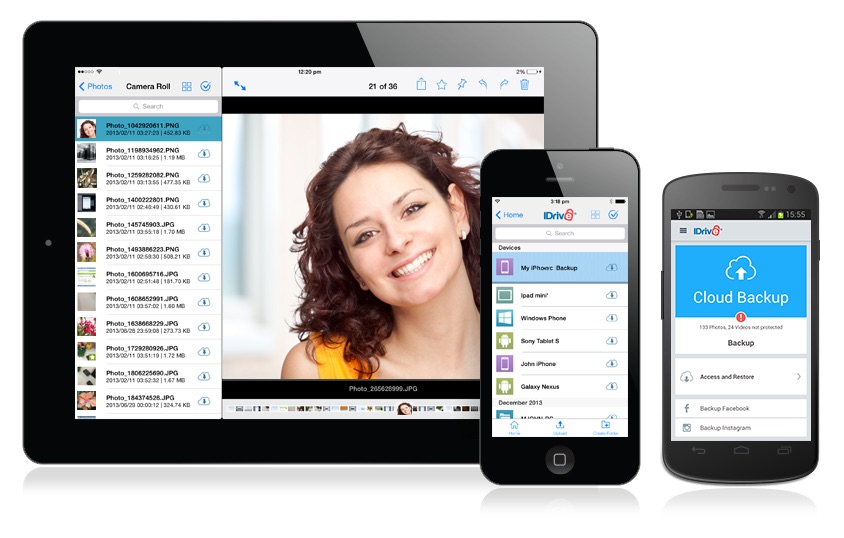
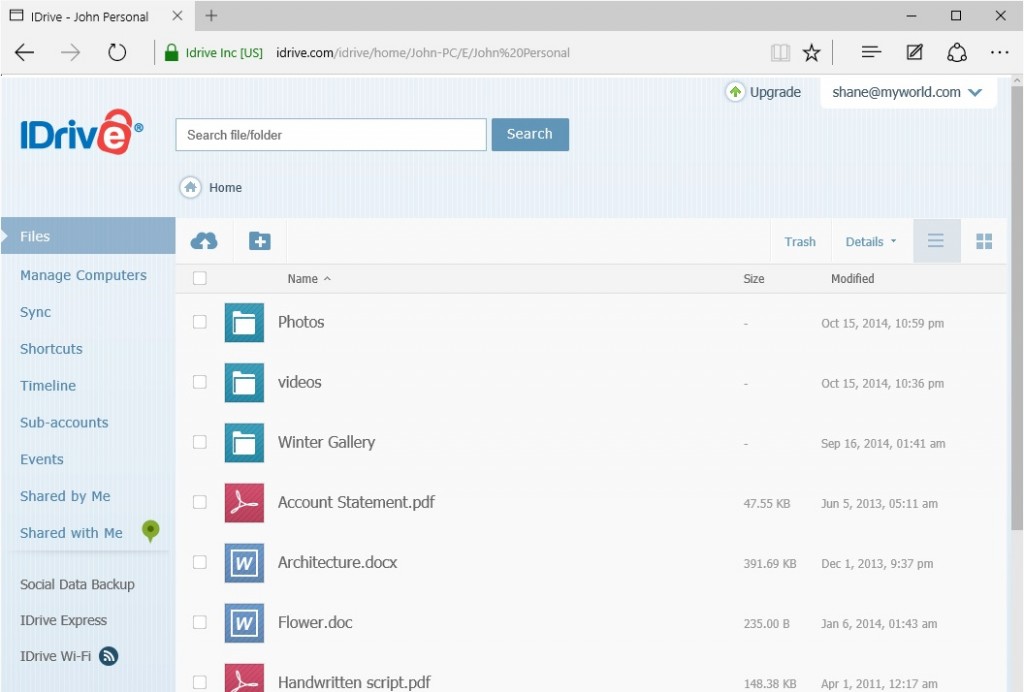
Users can get the iDrive mobile apps for iPhone and iPad. The app backs up contacts, photos, videos, health data, and calendars. It also syncs files between all mobile devices and backs up Instagram and Facebook accounts. Use it to share files or folders with others and view your backed up images or videos within the app.
Backblaze
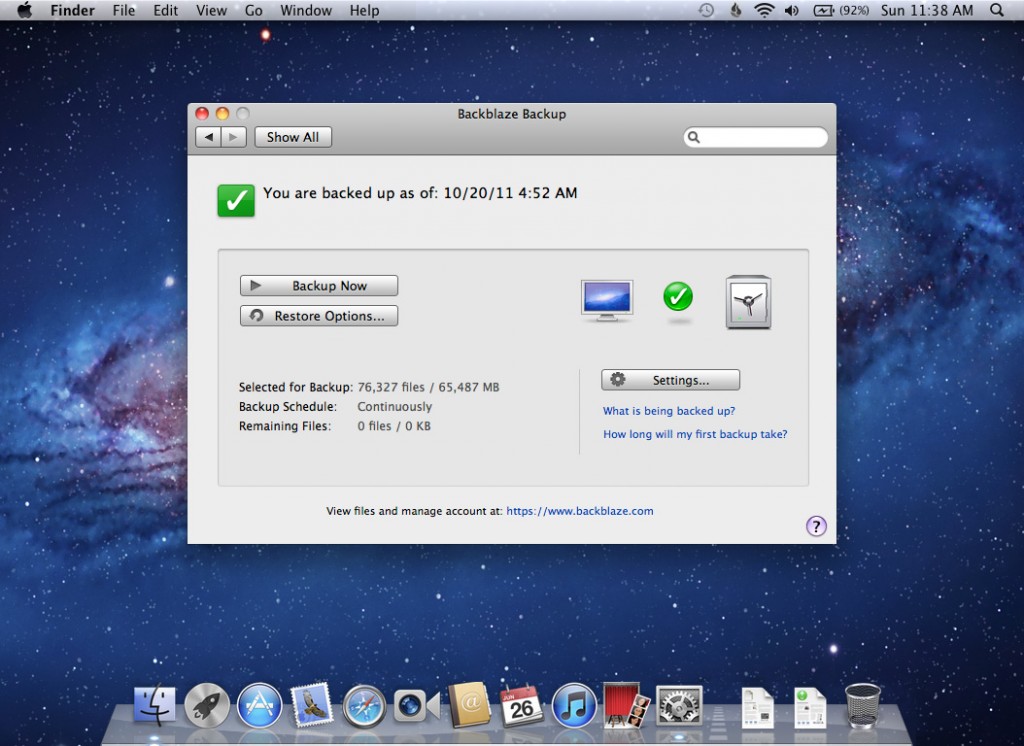
Backblaze also offers a solid backup service for a comparable price. Their regular price is less than iDrive at only $50/year for personal backup. However, that’s slightly more than the iDrive sale price. Users get unlimited storage, a huge benefit compared to iDrive. This makes it a better deal for those who need more than 1TB of backup storage.
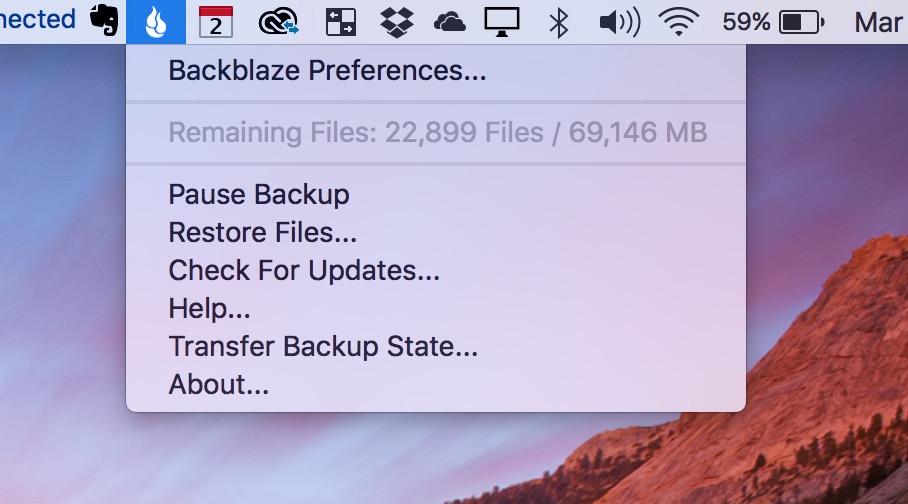
The program runs from the Menu Bar in OS X. Click on the little flame icon to access the following:
- Preferences
- Remaining Files to backup
- Pause the backup
- Restore your files
- Check for program updates
- Get help
- Transfer Backup State lets you pause backing up of this computer and transfer your backup to another computer
- About shows program info
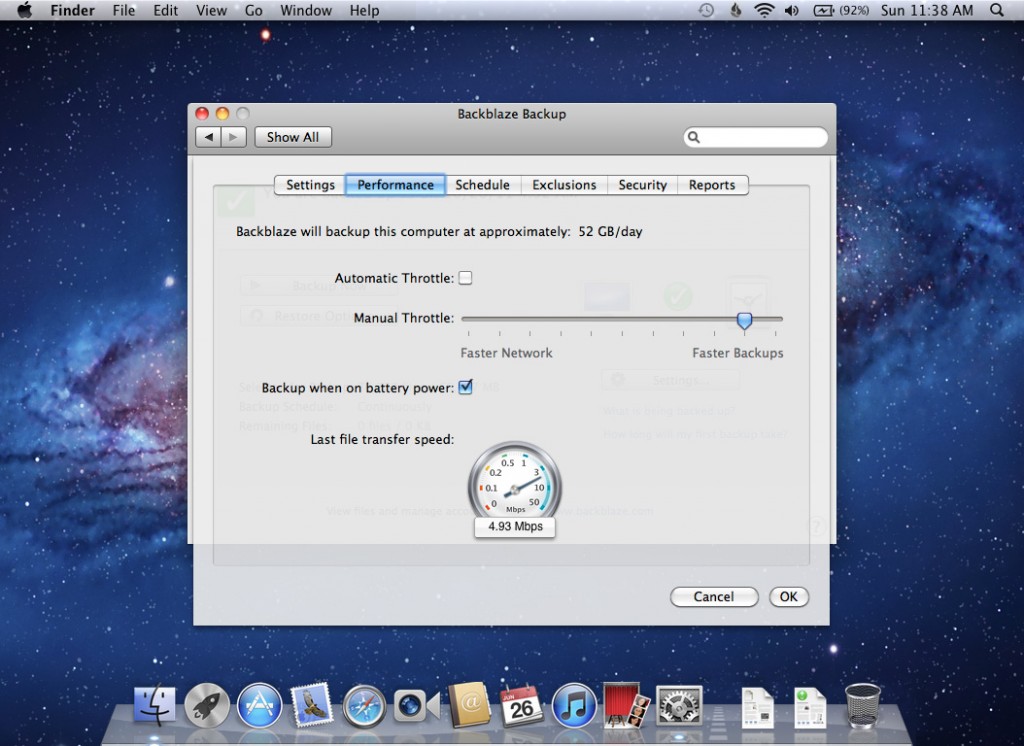
The utility is simpler than iDrive, but also doesn’t look as pretty. It includes many of the key features you get with iDrive. It comes preconfigured to start backing up the moment the user starts up the utility. Users can add more files to the backup since Backblaze backs up user files but excludes apps and OS X files by default.
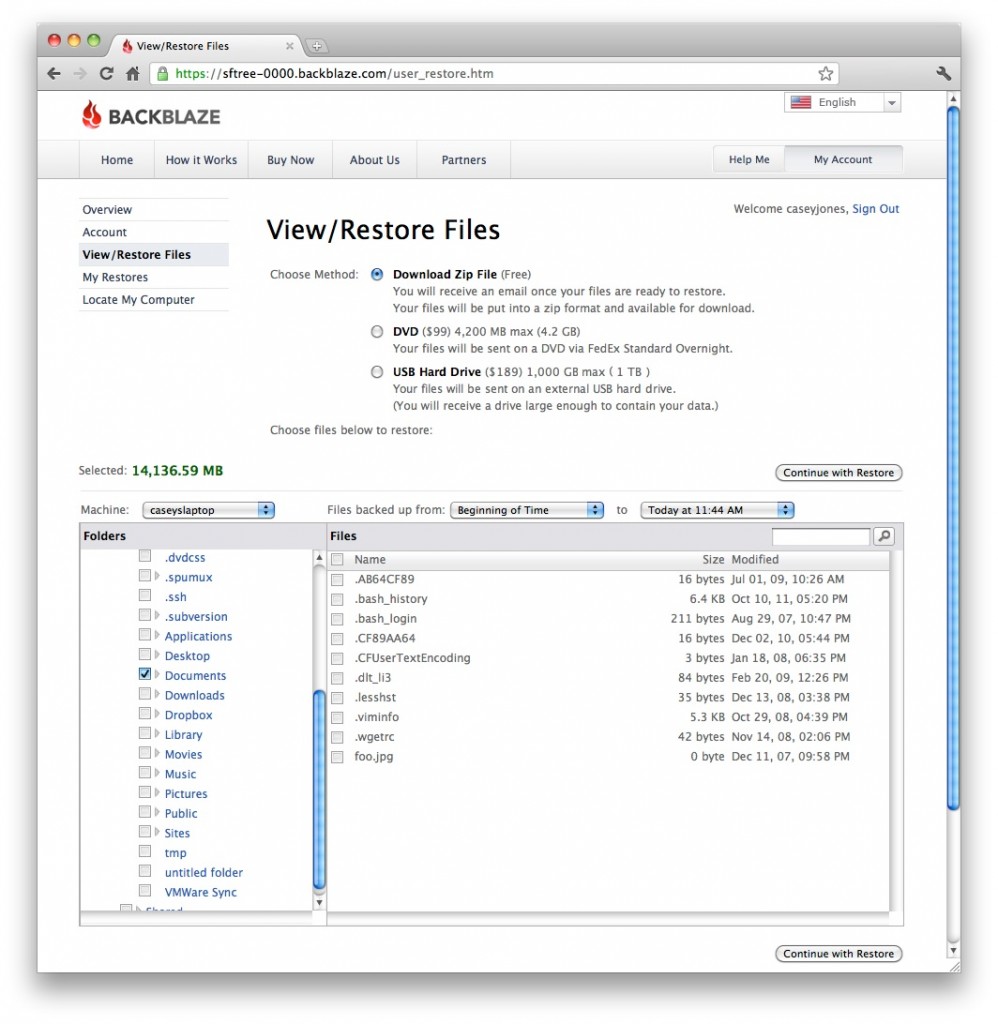
Backblaze offers three options to restore your Mac backup files. Download them from the web in the form of a single ZIP file, on a flash drive (up to 128GB) or a USB hard drive (up to 4TB). These last two will cost $99 or $189 and they deliver them overnight via Fedex. Backblaze also offers Backblaze iOS app. Use the app to see your files and download them after the service backs them up from the computer. It also shares files using the built-in iOS share feature. It doesn’t seem to back up the phone or tablet’s files like iDrive’s iOS app.
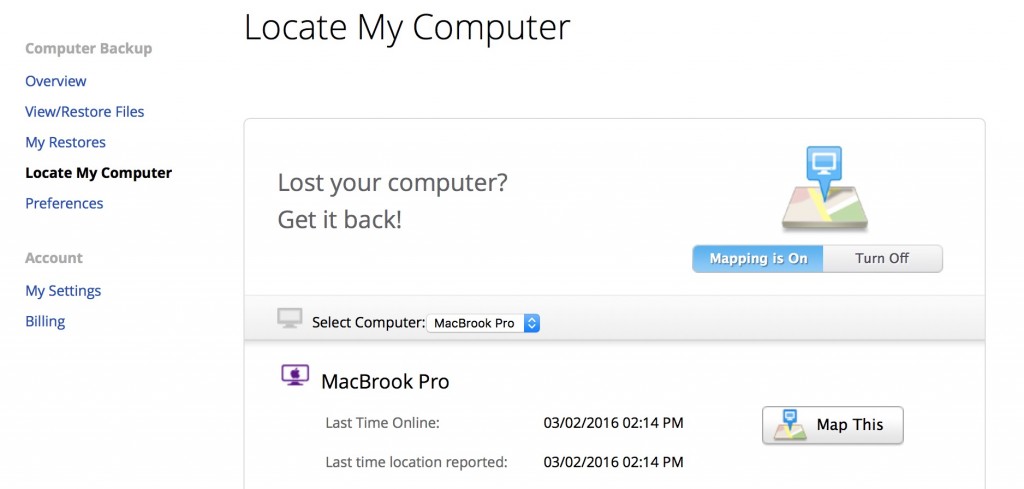
Backblaze includes one feature that you can’t get on iDrive. If a MacBook gets lost or stolen, Backblaze can be used it to find it. Go to their website and login. Use the Locate My Computer link along the left side of the screen. Click on Map This and it opens a map to show where the computer last logged into the Internet. However, I use a VPN service that seems to block this feature.
Recommendation
Start with Time Machine as your complete local backup. If you don’t own an external drive, get one. They’re not expensive and you don’t need a super fast drive. Find one the same size or bigger than your internal hard drive.
Next, turn on iCloud and get the 200GB option, unless you know you’ll need more space. It’s only $3/month for peace of mind and does more than backup. Don’t trust Apple alone, however, sign up for a file syncing service and/or iDrive or Backblaze. iDrive seems like the better solution for most people. Those who need more space than 1TB should buy a Backblaze subscription.
This takes care of the 3-2-1 backup strategy. You have 3 copies of your important files, on the internal drive, in Time Machine and in the cloud. The files are on two different media (three if you count the cloud which serves as the offsite backup).
For added security, clone your disks regularly and then store the cloned drive somewhere else. Mail it to a family member across country or take it when you visit. Do this a few times per year.
Related Posts
-
Here is a guide on how to detect Mac malware and safely remove it from…
-
Here is a guide on how to remote access a Mac from another computer to get…
-
While most people can access their email via the web these days, having a dedicated…