Windows 7 is built on the reliability of the Windows NT code base, which has strong lineage dating back to the early 90’s. With recent releases of Windows such as Vista and Windows 7, the platform is even more robust. However, Windows is still susceptible to instability. But are the root causes of this always Windows?
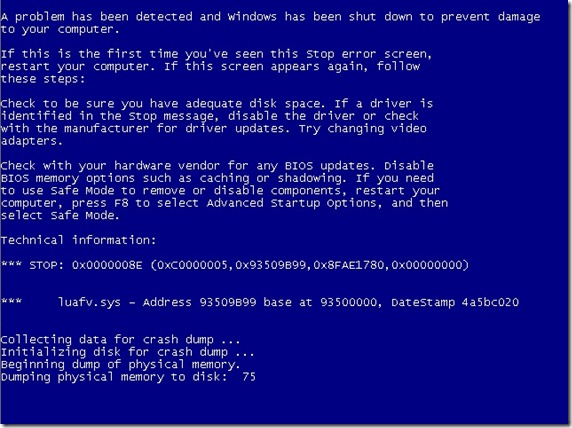
The Windows Memory Dump Screen
The appropriate name for this screen is ‘Memory Dump.’ It is rare on Windows these days, but it does happen occasionally. The common trigger for it is when an application or driver try to access a location in memory they do not have permission to access. This usually happens due to a poorly written device driver or application.
Common culprits:
- Video Card
- Network Adapter
- Faulty Memory Modules
- Faulty/Failing Hard disk
- Antivirus utility
- Attached devices (external USB hard disk)
- Antivirus or any application or utility that needs low level access in the operating system such as the kernel (the heart of Windows).
Diagnosing the problem.
Restart: By default, Windows 7 should automatically restart when a BSOD occurs. If it restarts and boots up normally then, you can check the Event Viewer and Action Center (see below) to see what might have caused the problem.
The Memory Dump screen will usually provide solutions you can attempt to resolve the problem with, while also providing information about what might have caused the problem. In the screen shot near the start of the article, you will see suggestions for what might be causing the problem and a recommendation to update the driver or disable it. The Memory Dump provided some technical information as to what system file is associated with this problem. In my case, its luafv.sys. Of course this is cryptic, but you might be able to resolve it, although you might not get far since it would make more sense to a software engineer. The first thing I will do is a web search to find out what luafv.sys is.
Here is what the web search results found:
luafv.sys (LUA File Virtualization Filter Driver) file, which is part of User Account Control.
Resolution:
Search your computer for luafv.sys, and make sure, it’s located in C:\Windows\System32\drivers folder.
You need to enable view of hidden, AND system files before you start search. If you have User Account Control turned on, try to turn it off, and see, if it helps with crashes.
Of course, not all Memory Dump issues are that easily resolvable. Others might be hardware related. Here are some things you can try:
If you continually experience a Blue Screen, it could be hardware added to the system recently, such as a USB printer. Remove it to see if the error reoccurs. The SCSI card in your System Unit many not have a compatible driver. If you have recently upgraded your graphics card, try reinstalling the old card and see if it resolves the problem. If the computer repeatedly displays the Blue Screen and you have tried everything, such as removing any external hardware devices with exception to the keyboard, mouse and monitor – try removing PCI cards. You should run hardware diagnostics supplied by the system manufacturer. For details on these procedures, see the owner’s manual for your computer.
Update BIOS:
Your computer just might need a special kind of update to work reliably with Windows 7. BIOS updates, although recommended as a last resort, can improve compatibility with installed or upgraded devices such as a video card or externally attached peripherals. BIOS updates are normally available from the manufacturer’s website. If you built your system yourself, the first place to check is the motherboard manufacturer’s website and search for the model number.
The Windows Event Viewer can help find what might have caused the problem, if you are able to successfully boot to the Windows desktop. Click Start, type: event viewer, then hit Enter on your keyboard. Expand Windows Logs and look through the log for the most recent error, this will compose information in the General pane indicating what might have caused the error.
Use the Windows Action Center:
Using the Windows Action Center can also provide information about an application or hardware device that might be causing system instability along with a solution.
To resolve a faulty system service problem as indicated by the action center: Disable the service and confirm that this resolves the error. If so, contact the manufacturer of the system service about a possible update.
If the error occurs during system startup, restart your computer and press F8 when you see a character-mode menu that displays the operating system choices. At the resulting Windows Advanced Options menu, choose the Last Known Good Configuration option. This option is most effective when only one driver or service is added at a time.
Resolving an antivirus software problem:
Disable the antivirus program, restart, and confirm that this resolves the error. If it does, contact the manufacturer of the program about a possible update.
Check your hard disk for errors:
Run Chkdsk /f /r to detect and repair disk errors. You must restart the system before the disk scan begins on a system partition. If the hard disk is SCSI, check for problems between the SCSI controller and the disk. You can learn more about how to run Check Disk here.
Faulty Memory
If you have recently upgraded the memory modules it’s a possibility that either the memory modules faulty or loose and need to be fitted properly. It’s useful, then, to check your memory modules for errors.
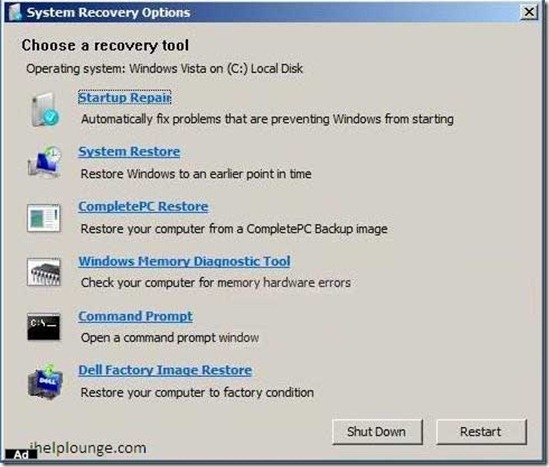
To access the System Recovery Environment in Windows 7, simply boot your PC, and just before the system loads the Windows operating system; hit the F8 key on your keyboard. This will launch the Advanced Boot Options menu. There you will see a new option for Repair Your Computer. Select this option and hit Enter on your keyboard.
On the system recovery screen, click Windows Memory Diagnostics Tool. Your computer will be restarted and the test will be run. If you are unable to boot into Advanced Boot Options, try booting from the Windows 7 installation DVD.
If an issue is discovered, it is possible that one of the memory modules is faulty. If you have recently installed new memory modules, check to make sure they are matching pairs and they are running at the same speed. One of the memory modules could be defective, so try booting with a single module at a time to see which one it could be.
Software:
If you have recently installed any programs since you started experiencing Blue Screens, try uninstalling the programs to see if it resolves the problem. If you are unable to boot into Normal Mode, try booting in Safe Mode, then remove the program.
Another thing to do in Safe Mode is disable Start Up items to see if any of them make a difference.
Reinstall Windows 7:
This is a tough one and the last recommendation when you have exhausted all other options. To avoid deleting your data, try doing a custom install over the current installation, that way, you can recover your data from the Windows.old folder. To do that:
- Boot from the Windows 7 DVD
- Click Install Now
- Accept the License Agreement
- When the option is displayed to select an installation type, click (Custom Advanced)
- Select the disk partition where you would like to install Windows 7 and click Next.
You will receive the following warning:
The partition you selected might contain files from a previous Windows Installation. If it does, these files and folders will be moved to a folder named Windows.old. You will be able to access the information in Windows.old, but you will be able to use your previous version of Windows.
At this point do NOT click anything named Format or Delete or Partition. This way even doing a custom install, your personal files are still preserved. Click OK.
Setup will now start the installation. During the installation, your machine will be restarted several times.
When the installation is complete, you will complete the Out of Box experience of having a new system, such as selecting your machine name, creating a username, password, and setting up your time zone. You can then proceed to download the latest updates for Windows and reinstall your applications and drivers.
You can then recover your personal files from the Windows.old folder and reinstall all your applications and drivers as detailed here.
If you continue to experience Blue Screens, this could be a serious sign of hardware failure, such as your hard disk or motherboard going bad. Take your computer to a reputable PC Repair Shop for further analysis and diagnosis. Write a note detailing all the steps you have already taken and make sure you have copies of your recovery software for the PC Repair Technician along with any documentation that came with your computer.
The Technician might also need access to your user account to make changes. I suggest you setup an account with Administrator privileges so they can effectively carry out their task.


