Apple recently released a beta version Photos, the replacement for iPhoto and Aperture. The app brings with it a deceptively advanced feature set that’s hidden inside a spartan user-interface. We’ve got 14 awesome features Apple packed into Photos for OS X 10.10.3 Yosemite.
People who want to get their eyes on Photos can download the public beta version of OS X 10.10.3 from Apple as part of their public beta program. Learn more about the public beta over at GottaBeMobile. Unfortunately, we just get the Photos app. Users must install full OS X beta, which some users may not want to do until it gets released as a stable operating system.
Watch a video demo of Photos below.
Easy Import of iPhoto or Aperture Libraries
The Photos app will ask the user to import their iPhoto or Aperture library of photos. Be careful, because this is a one way conversion. Updated libraries won’t open in iPhoto or Apertures, so backup first. Open Finder and click on the Pictures folder along the left side of the screen. Find the iPhoto or Aperture Library you want to back up. Right click on the library and choose Duplicate to make a copy. Now you can let the Photos app update the library and use it in the Photos app.
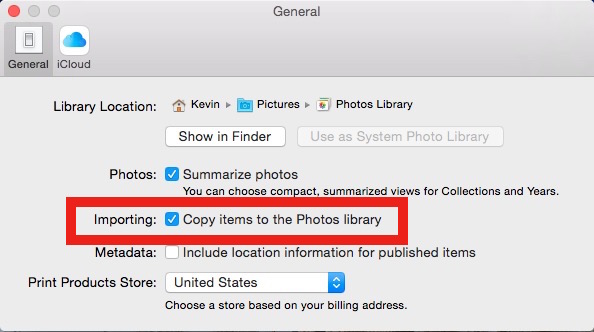
People who don’t want to move their photos into the Photos library can leave them where they sit on the hard drive. To do this, open Photos and click on the Photos menu at the top left next to the Apple icon. Click on Preferences. Another way to get here is to use COMMAND+,. Deselect Copy items to the Photos library.

People who don’t use iPhoto or Aperture can import photos from their hard drive or a flash card or connected camera. In Photos select the Import tab, which only shows up at the top of the window when there’s a card or camera connected. Select photos from the card or camera and choose Import. To import photos on the Mac’s hard drive, click on File and then Import, or use the keyboard shortcut COMMAND+SHIFT+I.
Deceptively Simple Photo Organization
The app surprisingly looks like little more than a very basic photo organizer. The advanced features get hidden behind buttons and in the menus.
Across the top of the window we get a Back and Forth button on the left for navigating through the Photos Moments and some tab buttons in the center which open the various parts of Photos. On the right we see buttons to create new projects, share photos and search for photos.
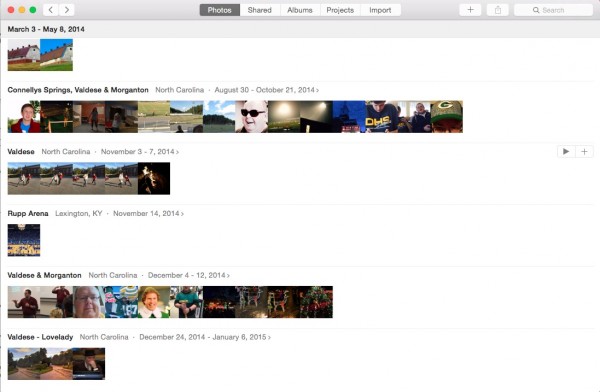
Inside the Photos tab, the program groups images in three ways: by year, by dates plus locations in what the program calls “Moments,” and then by a single day plus locations. Move between these three groupings using the two arrows in the upper left area.
The image thumbnails can grow or shrink using the slider that shows up when the user clicks the right button till it shows Moments grouped by a single day. See below.

Easy-to-Use Tabbed User-interface
In the center of the Photos toolbar we find five tab buttons labelled as follows:
- Photos – This shows the images in their Moments as describe above.
- Shared – Shows all photos the user shares with others with a way to add new photos to shared albums.
- Albums – Albums that the Photos app automatically creates or the user manually creates.
- Projects – Create projects like photo books, calendars, printed images, cards and more.
- Import – Select photos from an SD card, and iPhone connected via USB or a folder and import them into Photos (only shows up when a flash card, drive or camera connects to the Mac).

Quickly Create Projects
In Photos view there’s Plus button on the right end of the toolbar. Click it to show the list of projects we can create.
- Album – create a new album of photos and videos.
- Smart Album – create an album that changes based on the criteria a user defines as seen in the next section below
- Book – a photo book printed by Apple for fee
- Calendar – calendar printed by Apple
- Card – greeting cards printed by Apple
- Slideshow – a slideshow of images with music
- Prints – individual prints ordered from Apple
When someone creates one of these projects, it shows up under the Projects tab.
Albums and Smart Albums

There’s a difference between an Album and a Smart Album. Albums are static and only include the pictures the user places in that album manually or the app creates based on things like how the iPhone shot the photo. Smart Albums will dynamically change based on a set of criteria set up by the user. For example, someone can create a Smart Album based on whose Face shows up on the photo, the image title or photographic details like an aperture setting. Use either the file menu or the plus icon on the toolbar to create a new Smart Album.
The dialog box below opens when creating a new Smart Album. Give it a title and then select the drop down boxes to create “Definitions” for what kind of photos or videos to include. Use the plus icon at the end of the first Definition to add more than one Definition. Use the minus to remove one.

Beautiful Photos Printing Projects

Apple does a beautiful job of printing photos in prints, photo books, calendars and more. Use the Photos tab to select photos and then create a new project from the plus icon at the top right end of the toolbar. Open the Projects tab and select a project. Add more photos within the project and then the app will let the user order the project. Apple will print the project and send it to the user or to someone else if the user chooses to send it as a gift for a friend or family member.
Turn Albums Into Slideshows
Create a new slideshow in the Projects dropdown box from the plus button on the toolbar or in the tiny toolbar that shows up above a Moment in the Photos tab when the mouse hovers over it.
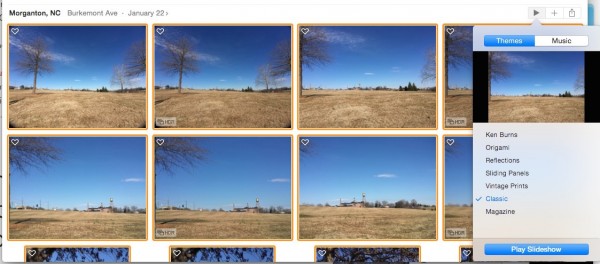
Photos comes with predefined Themes which controls the transitions and music added to the slideshow. Add your own music from iTunes using the Music tab in the pop-up box that shows up when creating a new slideshow. A preview shows what the slideshow transition will look like and the music plays so the user can hear it. Click the Play Slideshow button to start it.
Control What Syncs to iCloud Photo Library
Some libraries get huge, so control what goes into the cloud since Apple charges iCloud storage over 5GB at the following rates:
- $1/month for 20GB
- $4/month for 200GB
- $10/month for 500GB
- $20/month for 1TB (1,000GB)
That’s pretty steep when someone compared to the unlimited OneDrive storage Microsoft gives to Office 365 Home users for $99/year. Apple needs to change their pricing.
Here’s how to turn off iCloud Photo Library if you have a large library and don’t want to pay their outrageous prices. First, remember that it’s all or nothing for now. Photos won’t let the user sync just part of their library.
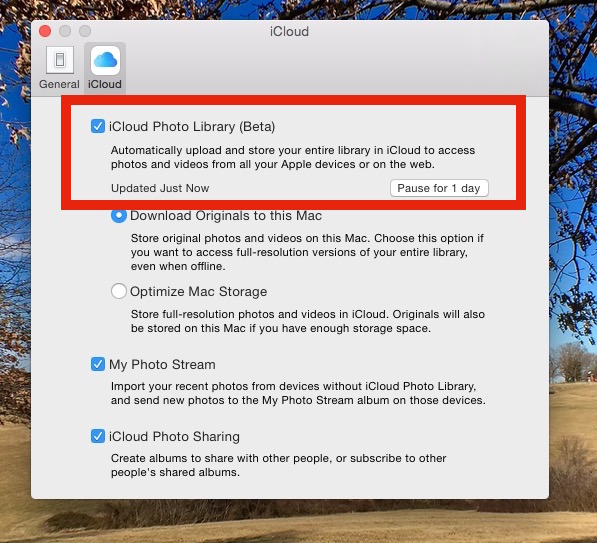
Open Preferences from the Photos menu next to the Apple icon on the Menu bar. Select the iCloud tab and uncheck the first item labelled iCloud Photo Library.
For those with limited local storage, select Optimize Mac Storage and Photos only downloads ]files to the computer when the user selects the photo’s thumbnail for editing or sharing. Images with a cloud icon on them are the ones not stored locally.
Remember that deleting a file on the computer deletes it from all the other devices sharing the same iCloud Photo Library, so be careful before deleting photos in Photos.
Sharing Pictures and Videos from Photos
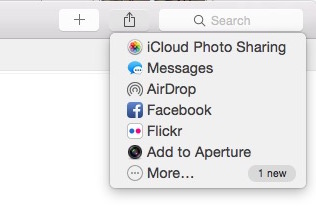
The Share button on the top toolbar, or on the tiny pop up toolbar that shows up when a user hovers over an album in the Photos tab, shares files to iCloud Photo Sharing, Messages, AirDrop, Facebook, Flickr or other programs the user installed. The list comes from the System Preferences app. Open the app from the Dock or from the Apple icon and choose Extensions. Click on Share Menu on the left and select which accounts to include from the list on the right. Those that can handle Photo sharing will show up in the Photos Share menu.
Basic and Advanced Photo Editing in One App

Double click on a photo and it will fill the screen. Along the left two columns of small image thumbnails shows up. Resize these thumbnails using the slider above the columns on the toolbar. Hide the thumbnails using the new button that shows up on the top toolbar between the arrow button and the image size slider in the upper left corner.

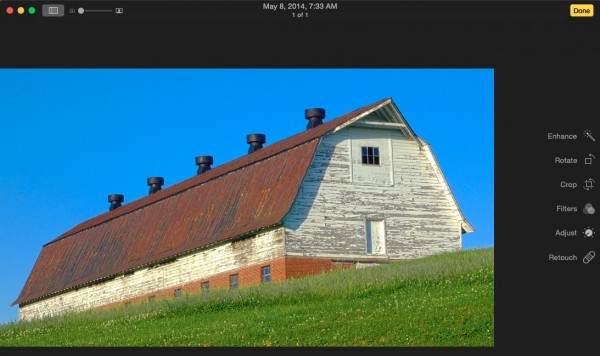
Edit the image by clicking Edit in the upper right corner of the toolbar. The background goes dark and a menu of image editing tools slides in from the right side of the screen. People used to iPhoto will recognize these tools. See the slideshow below for screenshots of each tool listed below.
- Enhance – automatically enhances the image and a good place to start with photo editing, but don’t stop there because it seems to over saturate most images.
- Rotate – turn the image 90 degrees counter-clockwise once with each click.
- Crop – crops images in free-form or set aspect ratios, rotates images up to 45-degrees, or flips the image horizontally.
- Filters – quickly change the look of a photo with one-click filters.
- Adjust – here’s where Apple put the advanced editing features like levels, histograms, color, white balance, saturation and sharpening.
- Retouch – heal photos by removing spots or unwanted details.
- Red Eye – this only shows up when Photos detects a face.
Photo Filters
When a user opens a photo and clicks on the Filters tool, Photos shows the original image in the center and a column of thumbnails along the right. Click the thumbnail to see what the image will look like with that filter applied. See the slideshow above to see what all the included filters look like when applied a portrait of my son.
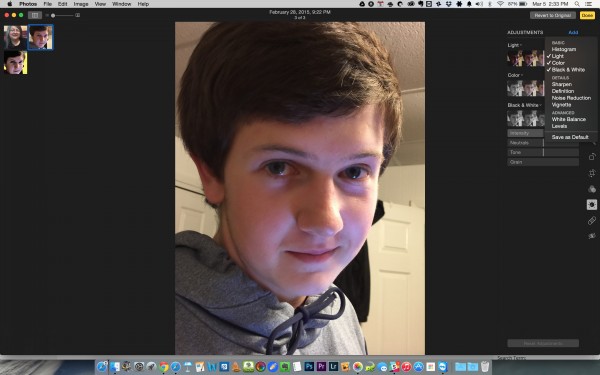
Heal Photos with Retouch Tool & Red Eye Removal

Sometimes we take photos with an annoying spot because the lens got dirty or wet. Other times a nice portrait looks bad thanks to a blemish or some red-eye. The retouch tool lets the user quickly remove those kinds of things with one click.
There’s also a new clone stamp tool that wasn’t in iPhoto. It lets the user copy one part of a photo over another part. Carefully remove a power line from the sky of a landscape or an annoying photo bomber behind that family portrait at the park. In the above image there’s a photo of my son. Notice the distracting background and the pimples on his forehead.

I cropped the photo, as seen in the screenshot above, clicked the enhance button to get some quick color correction, and then used the Retouch tool to remove those pimples. The photo could use some other edits, but it’s a good start.
Great Color Adjustments
Use the Adjustments tool to fix other things. Click on the Adjustments tool along the right when in editing mode. Click on the “Add” link in the upper right corner to add various Adjustment tools to the column on the right. Each of the tools collapses when the user clicks the tiny down arrow next to the name of the adjustment.
The available Adjustments include:
- Histogram – a visual graph that shows each level of light.
- Light – changes brightness, shadows, and highlights
- Color – changes saturation, contrast and cast
- Black & White – adjusts black and white
- Sharpen – fixes detail by sharpening or softening the photo
- Definition – makes image look clearer
- Noise reduction – takes away speckles introduced by low light photos with high ISO photos
- Vignette – controls the amount of darkness around the edges
- White balance – changes the color of a shot from cool to warm
- Levels – changes the amount of light at the bright, middle and dark areas
Keywords, Info and Ratings

The info button (an “i” inside a circle in the top right toolbar) opens this pop-up.
Photos lets users add keywords to a photo. A keyword helps the user later find their images. Add keywords like a person’s name, the place pictured or the subject of the photo, like outdoors or mountains. One way to add them is to open the photo’s info pop-up using the button with a lower case “i” inside a circle on the upper right. It shows the details like image filename, date, resolution, file size and file format. Here you can add a favorite to the image by clicking the heart icon. Also make a photo a favorite by clicking the heart on the main toolbar at the right next to the info button. Title the photo and add a description and keywords.
Conclusion
Apple did a great job refreshing their basic photo editing and organizing option. People who used iPhoto to work with their images will feel at home. Aperture users might find it limiting, so they should seriously consider moving to Lightroom instead or stick with Aperture for a while longer. Apple won’t stop it from working, but they do not plan any more updates.
Related Posts
-
Like on a PC, most of your Mac's software lives in the same place on…
-
Apple is issuing a recall for its wall plug adapters, after a limited number of…
-

Today, Apple updated its most portable MacBook ever with a spec bump and a press…