People can teach others how to use software or show gamers how to master playing a difficult part of a game by using QuickTime screen recording on a Mac. This saves money since they don’t need to buy expensive screen recording software like Camtasia at $99.99. We’ll show you how to record your Mac’s screen and your iPad or iPhone screen. Then find out how to quickly edit the video and share it with others using software already installed on the Mac.
We’re using OS X 10.10.3, but some of these steps should work the same way with little variance on older or newer versions of OS X. The only thing that doesn’t work on earlier versions of OS X is the iPad or iPhone screen recording tool in QuickTime.
To do a QuickTime screen recording, launch QuickTime from the Applications folder on the Mac. At launch it asks to open a file. Click on Done and then click on the File menu at the top left of the screen. Choose New Screen Recording or use the keyboard shortcut COMMAND+CONTROL+N.
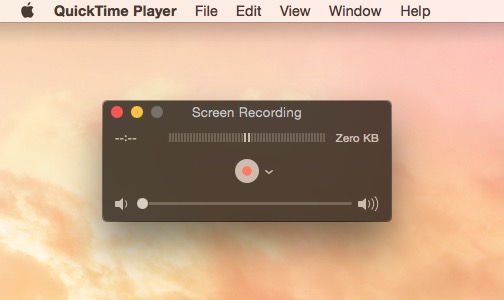
Use COMMAND+CONTROL+N to start a new QuickTime screen recording.
A tiny drop down arrow shows up next to the record button as seen above. Click it to choose the microphone. There’s one other option in the drop down list. It reads Show Mouse Clicks in Recordings. Turn this on for tutorials. It helps viewers see what buttons or menus they need to click in the software you’re teaching them. Keep it off for things like recording a video game. Change the sound volume level using the slider at the bottom of the box. Now we’re ready to record the screen. Click the red record button.
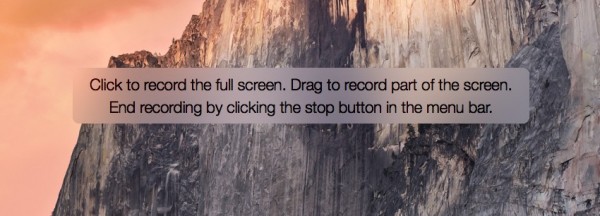
A helpful overlay shows up on the screen as seen above. It reads:
Click to record the full screen. Drag to record part of the screen. End recording by clicking the stop button in the menu bar.
This means the user should click on the screen to start recording the full screen. Users with two screens hooked up to their Mac should click the one they want to record. QuickTime won’t record both at once. If a user only wants to record a small window, then drag a box around that window using the mouse or trackpad. A button pops up that reads Start Recording. Click it to begin.

This shows the stop recording button on the Menu bar and it shows how users can record a small part of the screen by dragging a box around the portion they want to record.
At the end of the QuickTime screen recording, click the stop button in the Menu bar at the top of the screen. It looks like the image above.
Save the file to a place that’s easy to find like the Desktop. Do this by clicking on the File menu in QuickTime and then choose Save or use COMMAND+S. Save the file using the Finder dialog box that pops up. Hit the Save button after finding the right folder on the Mac.
Here’s a sample recording to show you what a raw recording will look after making a QuickTime screen recording.
Record Your iPhone or iPad Screen in QuickTime
One cool feature of QuickTime is the iOS screen recording built into the app. This only works in Yosemite or later. This lets people show others how to use a feature or app on an iPhone or iPad.
Connect an iPad or iPhone to the Mac using the USB cable. Open QuickTime on the Mac. Click on File, New Movie Recording… and a new recording box pops up like the one in our previous example. Click on the drop down arrow. This time choose the name of the iPad or iPhone under the Camera section on the list. Select the Mic and Quality setting. Click on the record button and start recording the iPad or iPhone screen. Do the same as above to end it and then follow the steps below for using the resulting MOV file. Save the file like you did above before sharing it.
What to Do with QuickTime Screen Recordings
So what can a person do with the resulting QuickTime screen recording made using the QuickTime screen recording feature? Users can do anything they can with any other video file:
- Upload it to YouTube.
- Email it to a friend.
- Save it on a flash drive and give it to someone.
- Put it in a PowerPoint or Keynote presentation.
Those are just a few of the things users can do. However, cleaning up the file and adding titles might make it more appealing and useful. Do that using a good video editing tool.
Macs come with iMovie and it has all the features people need to make an interesting video, whether the user wants to teach a task or show off their mad fragging skills in a game. iMovie can:
- Add text for a title, subtitles, to show on-screen signals for keypresses in a tutorial
- It lets users cut the video to get rid of long silence, boring sequences in a game or distracting noises they didn’t want in the video’s sound
- Add sound effects or music
- Put credits at the end
- Do basic video enhancements like brighten video, speed it up or crop it
We won’t take the time to explain how to use iMovie, or any other video editor here. People who need to learn to use a good video editor like iMovie, Adobe Premiere Pro or Apple’s Final Cut Pro X can use a great subscription video-based learning service called Lynda Learning.
Here’s a list of recommended steps a person should take before sharing their video regardless of the video editor they choose.
- Import the QuickTime screen recording MOV file into the video editor.
- Trim off dead space or distracting things off the front and back ends of the video.
- If necessary cut out things in the middle of the video that distract viewers or might bore them.
- Add transitions like fade to black at the front or back ends and dissolves in the cuts in the middle. Don’t use wild transitions since they look amateurish.
- Add a title at the beginning, credits at the end and a link to any pertinent websites.
- Put a watermark or “bug” on the video using an image file with transparency like a GIF or PNG file.
Here’s an example of a video produced with a watermark in the upper left corner for a post on GottaBeMobile.com.
Notice how the bug shows up the moment I say the name of the site.
Trim Using QuickTime
People who only want to trim unwanted frames the beginning or end of their QuickTime screen recording can use QuickTime for that too, especially if they don’t need transitions or titles.
Keep the video loaded in QuickTime and click on Edit and then Trim… or use COMMAND+T. The program brings up the trimming tool that looks like the image below.

Load the video in QuickTime and click on Edit and Trim… to cut off the stuff you don’t want on the beginning or end.
On the lower right end there’s a yellow border with two vertical black lines in it. Drag using the lines to move towards the right to cut off the beginning of the video. Do the same with the lines at the right end of the video timeline dragging left this time to cut off the end. Then click on the Trim button on the right to cut them off. Either click File and Save to save it in the same video format or choose File and Export to convert it to another format.
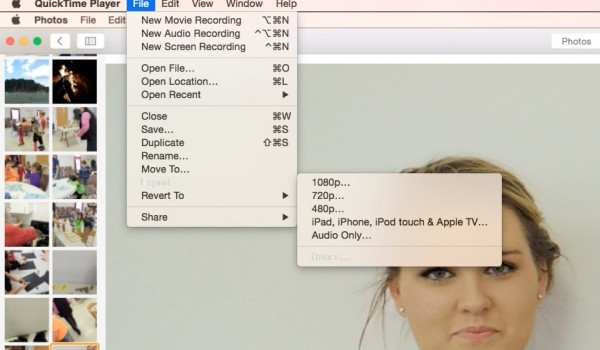
QuickTime will export to many useful formats and sizes.
Notice that it exports to the following sizes/formats…
- 1080p – full HD video, which is best for the highest quality. Don’t select this if you need to send it to someone over the Internet.
- 720p – lower resolution but still high-quality HD.
- 480p – only use this if quality doesn’t matter.
- iPad, iPhone, iPod touch & Apple TV – best for playing on these devices.
- Audio Only – removes the video and saves only the audio of the video into an audio file, which isn’t that useful for screen recordings.
- iTunes – grayed out above, but this option sends the file to iTunes automatically.
For many people, QuickTime does all they need. Others will want to use iMovie or something more powerful like Final Cut Pro X ($249.99 in Mac App Store) or Adobe Premiere Pro (part of Adobe Creative Cloud subscription which costs $49.99/month).
Sharing the Video
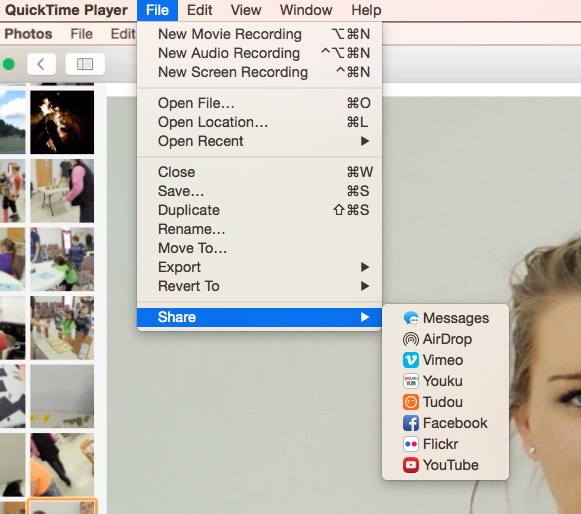
Many people don’t know that QuickTime includes some sharing features thanks to the new Share Sheets in Yosemite. After users finish trimming their videos in QuickTime they should save it to keep a local backup. Then click on File and Share. A list of options pops up that include:
- Messages – send smaller videos over messages. Yosemite saves the file in iCloud Drive and sends a link to the recipient’s cell phone.
- AirDrop – send over Wi-Fi to another person on the same network using the AirDrop feature in Finder.
- Vimeo – uploads to the video sharing site.
- Youku – uploads to the video sharing site. It’s like the YouTube of China.
- Tudou – uploads to the video sharing site. Another Chinese YouTube.
- Facebook – uploads to the social networking site.
- Flickr – uploads to Yahoo’s picture and video sharing site.
- YouTube – uploads to the video sharing site.
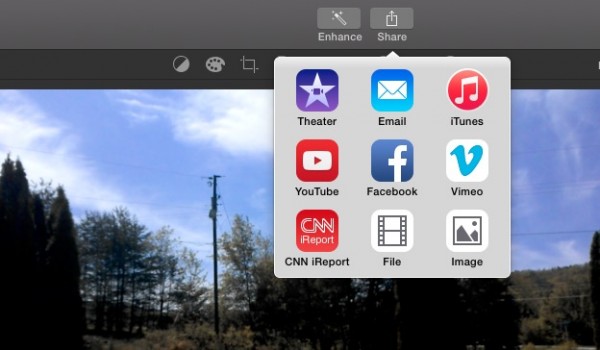
Find the Share button in the upper right corner of iMovie.
Other programs used for video editing also include sharing features. iMovie will share to:
- Theater – Apple’s cloud syncing storage site for videos created in iMovie.
- Email – send the file over your default email client like Apple Mail.
- iTunes – exports it to iTunes.
- YouTube – uploads to the video sharing site.
- Facebook – uploads to the social networking site.
- Vimeo – uploads to the video sharing site.
- CNN iReport – uploads to the news network’s citizen reporting site.
- File – exports it as a file saved on the local hard drive.
- Image – exports a frame of the video using the spot showing on the screen at that moment. This is great for creating a splash screen photo for sites like YouTube or for a website.
