Whether you’re new to OS X or a long time Mac veteran, it can be difficult to understand the Mac’s screenshot functionality. Fortunately, figuring out how to use these effective tools is not as difficult as you might think – read on for more on how to take screenshots on Mac OS X.
One of the most powerful – and unfortunately, unknown – tools for digital communication is the screenshot. Whether you’re using a PC’s Prt Scrn (print screen) button, the iPhone’s Home+Power button combination, or OS X’s own arcane keyboard commands, knowing how to take a screenshot can make sharing all sorts of content, or even getting some quick and effect tech support, easier than ever.
What is a screenshot, and why would I want to take one?
A screenshot is like a snapshot of your phone or computer’s screen – whatever it’s showing at the time you take the screenshot. If you were to take a screenshot right now, it would generate a picture of you see – in this case, a browser showing a blog post about how to take screenshots.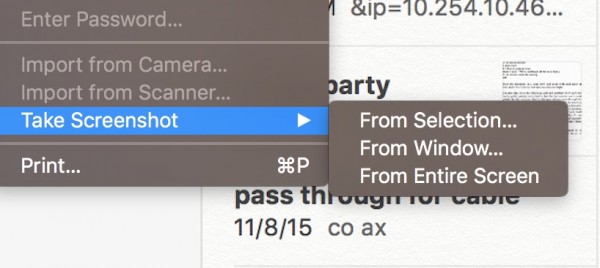 These pictures can be extremely useful, in ways you might not consider. If you’re working on a project, and just need quick feedback, taking a screenshot and sending it to a friend or coworker can net you simple results without the rigamarole of saving a large project file, finding a way to share it, and hoping that the other person has the right software for opening the file you send.
Additionally, if you’re in need of some quick tech support, taking a screenshot can be a fast way of explaining to someone else what your problem is – and it works whether you understand the error or not, which is what makes it such an important tool.
Your Mac actually has a lot of interesting tools available to take screenshots, all built in to OS X. We’re going to start with the simplest way to capture what’s on your screen.
How to take a screenshot of your Mac’s screen:
 The most basic way to capture the image of something on your screen is to simply take a picture of the entire screen at once. It feels like a complicated command, but you just need to press three buttons at the same time:
Command + Shift + 3
If you have your volume turned up, you’ll hear a click sound – that’s the sound that your Mac makes when you take any kind of screenshot. If you’re used to taking a screenshot on a Windows-based PC, you might think you now need to paste your screenshot someplace, but you actually don’t – the second OS X takes a screenshot, it’s automatically saved to your desktop.
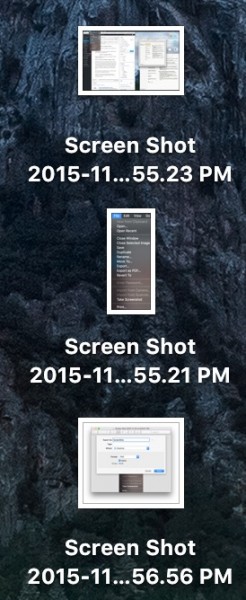
If you minimize all of your windows, or use the multitouch swipe gesture to show your desktop, you should see an icon titled something like this:
Screen Shot 2015-11-19 at 2.01.22 PM.png
The date and time will be whatever date and time it is when you capture the screenshot. If you want to rename this image, click on it and hit the enter or return key on your keyboard; then just type whatever you want to call the screenshot, and hit your enter key again. From here you can save it, email it or share it to whomever you might wish (skip ahead to the end if you want to know how to share with Dropbox automatically).
Right, okay, but what if you want to only share a specific portion of your screen, like a corner of the desktop, or maybe just a little part of a webpage. That’s okay, we’ve got you covered.
How to take a screenshot of a selected area of your OS X screen:
If you remember how to take a screenshot of your Mac’s display (and you should, since we just covered it! but if you’ve forgotten, scroll up and take another look; I’ll be waiting here when you’ve finished), then taking a screenshot of just a piece of your Mac’s screen should seem pretty familiar.
You’ll need to press these three buttons (note the different number that gets pressed):
Command + Shift + 4
Unlike the last method, which took the screenshot as soon as pressed those keys, you won’t hear a sound just yet. Instead, you’ll see your cursor replaced with an icon and a set of numbers. For the most part, the numbers are unimportant – they simply indicate where on your screen you are (think of them as coordinates on a map).
Move your new cursor to the area you wish to capture. Click and drag – don’t let go of your mouse or trackpad button – and you’ll see a grey, translucent rectangle appear on your display. Whatever is underneath that grey rectangle is what you’ll capture in your screenshot.
Once you’ve moved the rectangle to cover the area you want, just let go of your mouse or trackpad button. Now you’ll hear the familiar screenshot click, and you’ll see another image file appear on your desktop. This time when you open it, however, you’ll notice that it’s just a small part of your screen, instead of the whole kit and caboodle.
How to take a screenshot of a single app on your Mac’s screen:
Sometimes you want to capture everything that a specific app is showing – maybe a web browser, company tool, or something else entirely. You don’t need to capture the entire screen, but you also don’t want to have to draw around the app like we illustrated in the last section – if you have to take more than one or two, doing it by hand will get old, fast.
This command will look familiar, since it’s the same one you use to capture a specific section of the screen! At the same time, hit these three keys:
Command + Shift + 4
Like before, you’re not quite finished. Instead of drawing around, hit the Space bar. You’ll see your app turn a fuzzy green color. Move your cursor over top of whichever app you wish to capture: as you move from app to app, you’ll see the fuzzy green overlay follow you around.
Once you have the app you want to capture selected, simply click, and you’ll have that window saved directly to your desktop, like with earlier commands.
How to save a screenshot to your OS X clipboard, not desktop:
Sometimes, you’ll want to save a screenshot directly to your Mac’s clipboard instead of saving it to the desktop. You might run into this situation when you’re pasting images directly into a program or document.
The commands are almost the same as the ones we’ve previously discussed, with one tiny addition: hit Command along side all the other keys.
So if you want to save your entire desktop to the clipboard, it’s
Control + Command + Shift + 3
If you want to save just a portion of your screen to the Mac clipboard, it’s
Control + Command + Shift + 4
after which you draw the rectangle to cover the portion you wish to capture.
Finally, if you want to send a screenshot of a single specific app straight to your clipboard, hit
Control + Command + Shift + 4
followed by Space, then mouse over to the app you wish to capture and click on it.
How to save your screenshots as jpegs, or JPGs:
By default, OS X saves any screenshots you take as a .PNG file. It’s a format that prioritizes image quality over file size, which means that a high resolution screenshot might result in a larger image than you want. Sometimes, you’ll want a JPEG or JPG instead – it’ll give you a much smaller image that often works better with websites or tools than PNG does.
Like with taking a screenshot, however, your Mac provides the tools to do this within the OS itself.
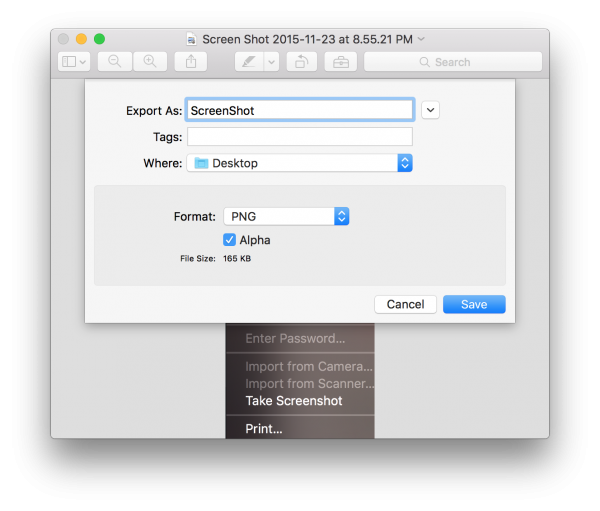
 Find where you saved your screenshot (it’s probably saved directly to your desktop), and double-click it to open it in OS X’s Preview app. You’ll see your image appear inside of a window.
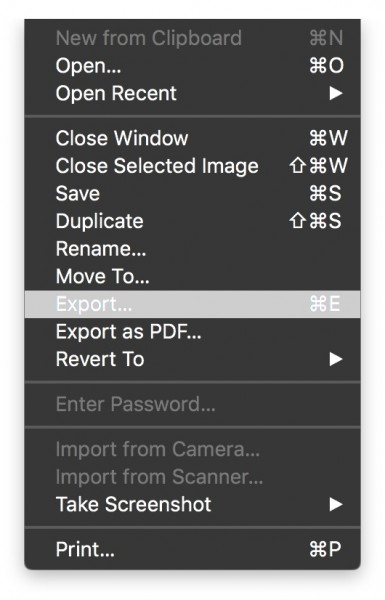
From here, mouse up to the title bar at the top of the screen. Click on File, and in that dropdown menu, click on Export. A new window will appear on top. Find the box next to Format: and click on it; you’ll see a bunch of different options. Select the one that says JPEG, which should be at the top of the menu.
A slider will appear that lets you decide whether to prioritize image quality or file size – if you slide to the left, or Least, your image will take up very little space, but might not look very good. If you slide to the right, or Best, your image will take up a little more space, but appear nearly indistinguishable from the original.
By default, OS X selects a good medium somewhere in the middle.
How to save your screenshots to Dropbox and share them:
If you want to save your screenshots to Dropbox, you don’t have to fumble with dragging them around or using your web browser. Instead, you can use the official Dropbox for Mac app to do it automatically.
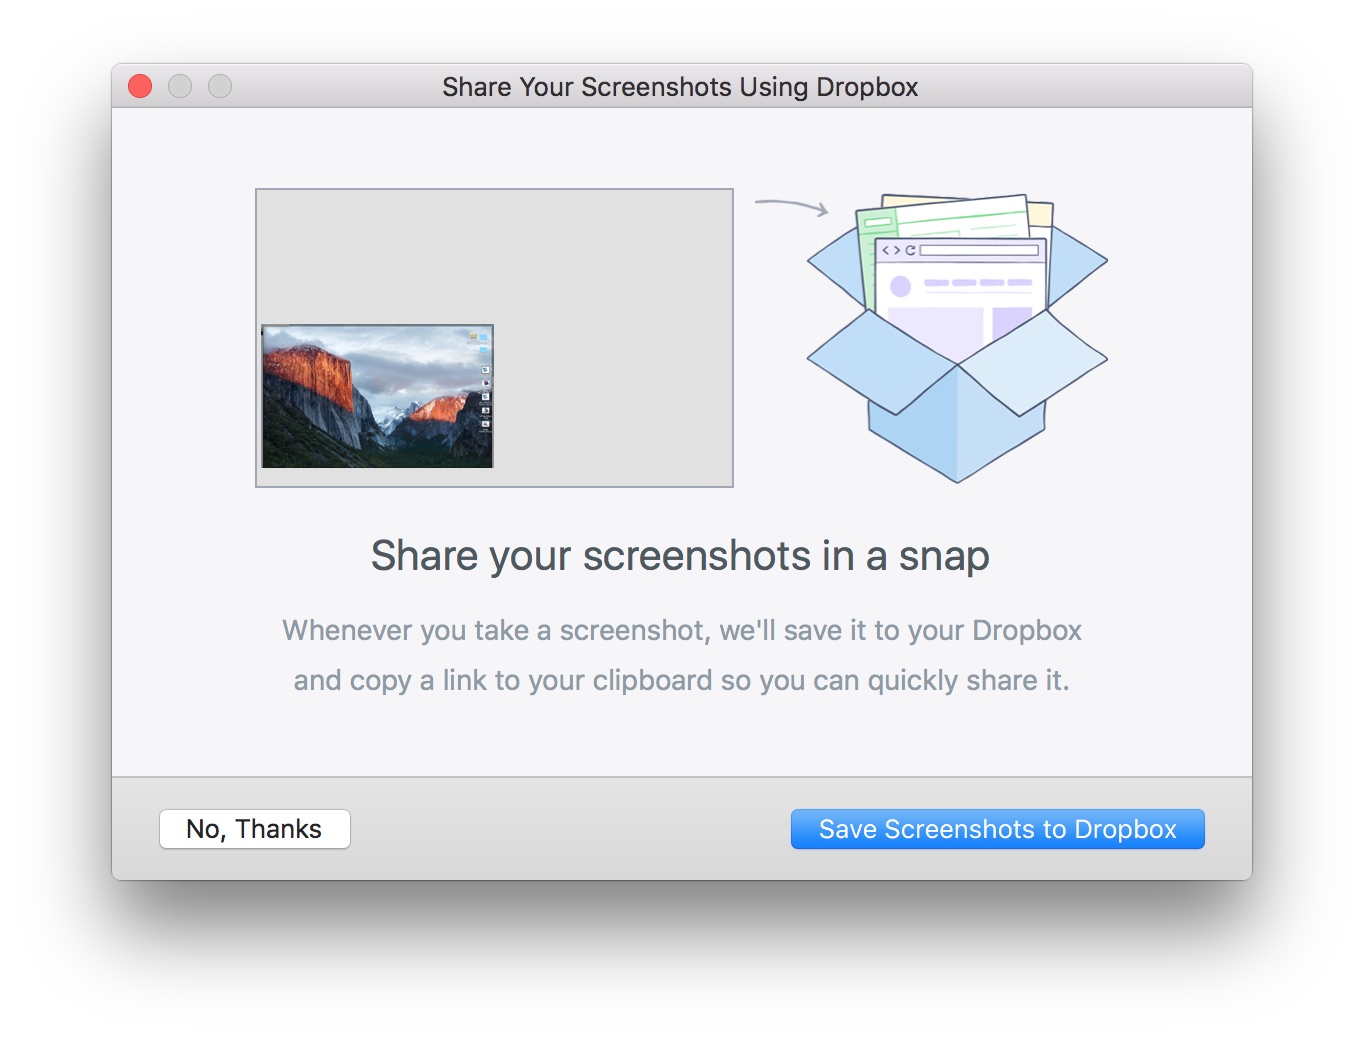 Navigate to https://www.dropbox.com/install in whatever web browser you like. Install the app that they provide you, and sign in. By default, the Dropbox app will give you the option to save your screenshots to Dropbox automatically – all you have to do is agree when it asks you.
If you’ve installed Dropbox a long time ago and want to enable this screenshot sharing, simply open up the Preferences window of your Dropbox app and make sure the upload screenshots option is checked.
Now, whenever you take any kind of screenshot, it’ll get saved to your desktop for just a second or so, and Dropbox moves it to your Dropbox folder, uploads it, and puts the link directly into your clipboard.
That means that you can take a screenshot and instantly paste a link to it into any email or messaging app. If you want to use the original screenshot image for something, you can find it inside of a Screenshots folder within the Dropbox folder saved on your Mac.
Related Posts
-
While most people can access their email via the web these days, having a dedicated…
-
What is the Mac swapfile? Is it important? Can you delete it? We'll walk you through this…
-
Like on a PC, most of your Mac's software lives in the same place on…