Building off of our Google Voice 101 series that shows you how to sign up for Google Voice and how to get started with Google Voice we are graduating on to the more advanced courses at Google Voice University.
 This guide is part of a week-long series we’re calling Google Voice University, which will take you from a beginning Google Voice user all the way up to a Pro in a series of short guides.
This Google Voice 201 level guide will teach you how to be a Google Voice Power user with groups, rules, screening and blocking callers.
How to Use Groups in Google Voice:
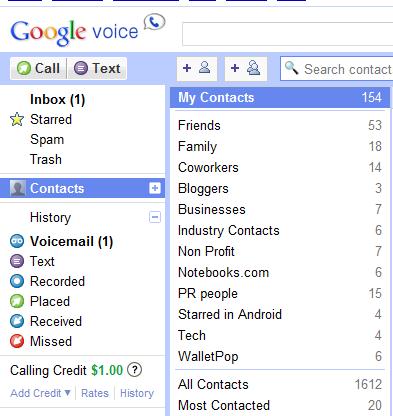
To get the most out of Google Voice you’ll need to take a few minutes to organize your Google Contacts. The easiest way to find this is to log into Google Voice and click on Contacts. Remember that these are the same contacts that you see in Gmail and that will sync to your smartphone if you connect it to Google.
This image shows you the groups you already have. If you don’t have any groups you can click on the small icon at the top showing a + and two people or create one in the next step. These groups will allow you to automatically handle calls from specific groups of people so think of groups you want to be screened or that you all want to get the same voicemail.
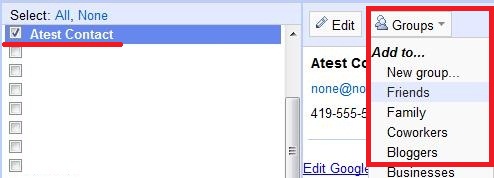
Step 1: Choose a contact by checking the box next to their name. If you want to add numerous contacts to the same group, you can check more than one at a time. Then click Groups.
Step 2: After clicking on groups, select the group you want to add the contact(s) to with a left click. That’s it, just make sure you unselect all before going to the next group.
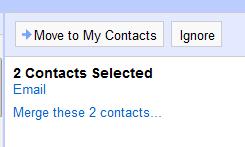
If you don’t see a contact listed that should be, they may be in the “All Contacts” group instead of “My Contacts”. From the home Contacts screen you can get a group of suggested contacts and add a contact to “My Contacts” by selecting them and then clicking “Move to my Contacts”, from which you will be able to put them into groups.
How to Screen Calls with Google Voice:
Another handy Google Voice feature is call screening. This allows you to listen in on a call and can even be configured to ask unknown callers for their name. From there you can decide to answer the call or send it to voicemail. Turning on call screening for everyone is as simple as visiting the Google Voice settings page and clicking on the “Calls” tab.
 Make sure you click save to make your changes active. If you have trouble with one of your forwarding phones picking up your Google Voice calls, essentially stealing it, because your ring time is to short this is a good setting to turn on to avoid call stealing.
How to set Voicemail and Screening Rules with Google Voice:
Now that you’ve had a chance to set up your groups, you can start using them to streamline your communications. Google Voice allows you to set specific rules for each group including what phones to ring for a specific group, what message they hear and whether or not their calls are screened.
To adjust these rules, visit the “Groups” tab in Google Voice settings where you can get an at-a-glance look at your Groups and their rules.
 From here setting up rules for a particular group is as easy as clicking the Edit button and changing the checkmarks to match what you want to happen for each group.
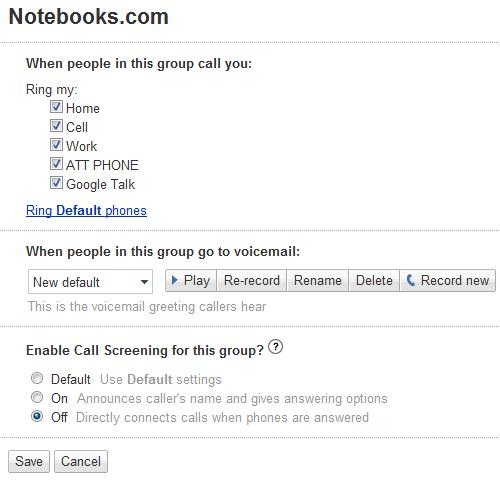 The first setting allows you to have specific groups ring specific phones, no matter what your normal settings are. The next setting let’s you choose a voicemail greeting based on who is calling and finally you can turn call screening on or off. When you are done click save and your calls will start to come in as you want.
How to Block Callers in Google Voice:
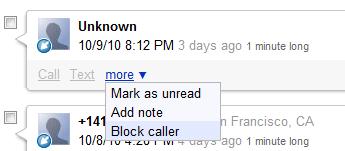
Another really useful Google Voice feature is the ability to block callers. If you keep getting calls from a business or caller you don’t want to reach you, just log into Google Voice, click on History and in the “more” drop down choose “block caller”.
Now they’ll hear a number is not in service message and you’ll never hear from them again.
This is part of Google Voice University, a week-long look at how to use Google Voice. This third lesson is a look at the more advanced settings and tomorrow we will cover how to use Google Voice with your smartphone — by the end of the week you’ll graduate with a masters in using Google Voice.
