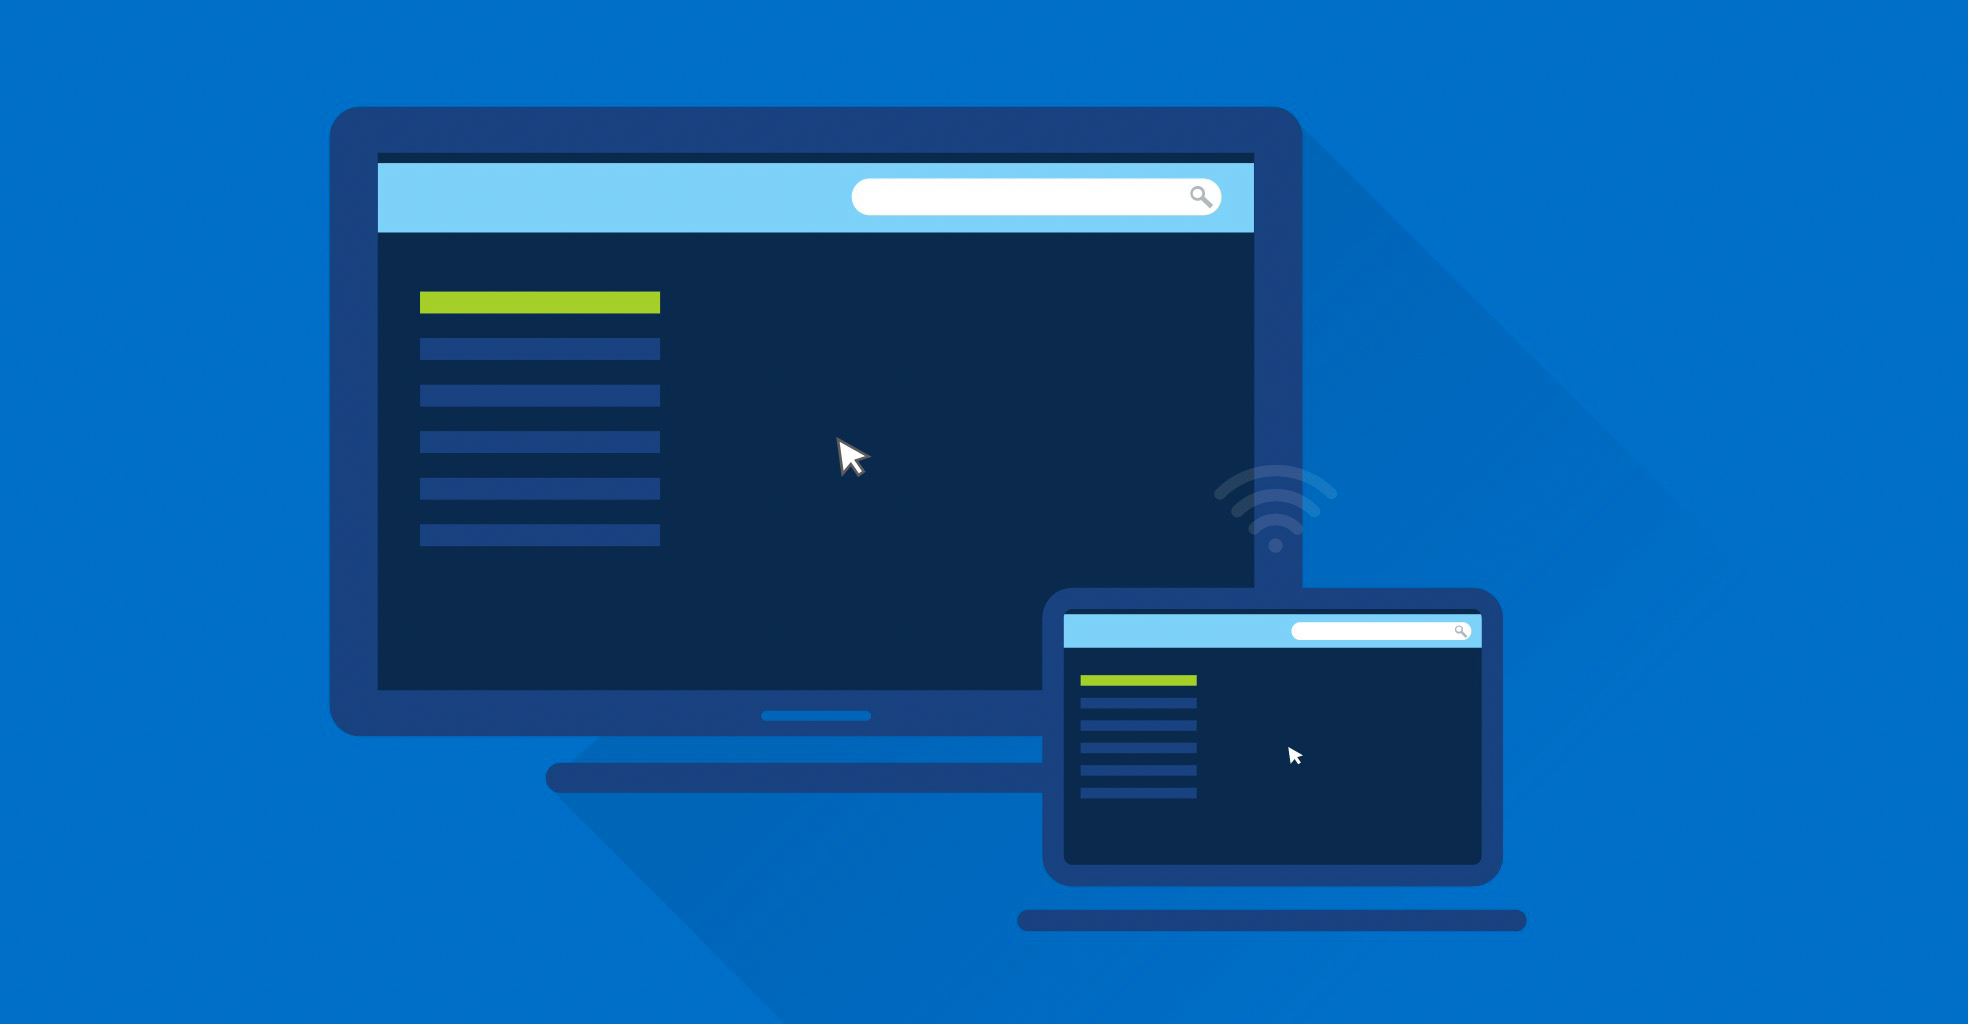
Trying to connect a laptop to the TV can be just that: trying. We go over what you need to know to make hooking up your laptop to your TV easy and fun.
Hooking something up to your television has always been used as some kind of illustration for how confusing technology can be. Whether it was setting the clock on your VCR (that’s a smart box that connected to your television to play movies on something called a cassette tape!) or hooking up a video game console, the television has often been viewed as a black hole of complexity.
Fortunately, technology has evolved and adapted over time, and these days, it’s easier than ever to hook things up. A lot of this can be attributed to the development of HDMI. It stands for High-Definition Multimedia Interface, but you don’t really need to remember that.
Copyright: Intel
There are two pretty big changes that HDMI brought to the consumer technology landscape. The first of which was combining both audio and video into a single cable (a first for HD, it should be said, since basic cable was always delivered over a single coax cable); the second was making the cable easy to plug in. Older cables required delicate and hard-to-grip screws to be turned, in order to secure the cable to the TV.
One final note: you can connect a laptop to the TV with a cable, or with a number of wireless technologies. Using a cable make it just as responsive as a computer monitor – you can use it in exactly the same way. Wireless connections, however, can’t support the same kind of frame rates. You might find your mouse cursor lagging a little bit, for example, or scrolling a web page really fast will seem to stagger. For the most part, this won’t affect what you do – you can usually watch YouTube or a video without noticing a single difference. What you can’t really do wirelessly, however, is play any kind of video game that isn’t point and click.
With that in mind, let’s talk about how to connect your laptop to the TV both with – and without – wires.
How to connect a laptop to the TV over HDMI
There are a lot of different kinds of laptops out there, so let’s cover the bases. Most recent (the last several years) laptops come with an HDMI port, which makes this entire process much, much easier. If you don’t have an HDMI port, you might have a DVI port or a VGA port. Here’s what the three cables look like:

Most modern HDTVs only come with HDMI ports these days, though you might also see one with DisplayPort or the occasional DVI and VGA. If your laptop only has HDMI, you’re good to go!
If it only has DVI and your TV only has HDMI, you’ll need to pick up a dongle that converts HDMI to DVI. These are cheap and work well, because HDMI is just the DVI video signal, plus audio. The converter just changes the pins, which makes them easy to buy and use. One downside to this is that most DVI ports and cables don’t support audio, which means you might end up with sound only coming out of your laptop – you’ll need to hook up some speakers directly to your laptop, if that’s the case.
Unfortunately, if your laptop only has VGA and your TV only has HDMI, the only way to hook it up is to buy an expensive box that actively converts your analog VGA into digital HDMI. In addition to being pricey, it can be difficult to find a reputable unit that will work consistently and not flake out on you, and even then, you’ll still be stuck with the same audio problem as in the last paragraph.
But most of you probably have an open HDMI port on your laptop. To hook up your laptop to the TV, plug one end into your laptop’s HDMI port, and the other end into your television. Easy!
You might want to change some settings
On the TV
Once you have the cable plugged into both devices, you might want to go and change some settings, both on the TV and on your laptop. Let’s cover the TV firsWith the TV and laptop powered on and connected, find the right input by going into your TV’s menu (or hitting the INPUT button on your television’s remote control, if it has such a button) and trying the ports until you find the right one. You can make it easier by looking on the back for a label over the HDMI port you used, like “HDMI 1,” and switching your TV directly to that connection.
Not all TVs support this next part, but look to see if you can change the label or name of the connection in your TV’s settings. There might be an edit button or option that you can select. Look through the menu of possible names and find one that looks like “PC,” or something similar, and select it.
The reason you should rename this connection is that most HDTVs apply substantial amounts of processing to whatever they display. It might mean that black levels or colors change, that sharpness is turned up or down, or that some kind of upscaling might be happening. Switching the labels can, on many TVs, inform the TV that this is connected to a PC, and that all of these processes should be turned off.
On the laptop
There are a couple of things to change on your laptop, as well. On a Windows PC, you can hit the Windows key + P at the same time, and you’ll see a number of options for how your laptop should treat the TV as a display. There are a four different options here: activate only the computer display, activate only the secondary display (in this case, the TV), extend the display from the laptop to the TV, or mirror the laptop display on the TV.
As you’re reading this article, chances are good that you don’t want the first option. If you plan on using your laptop for something while it’s connected to the TV, you should choose the third option (extending). This way you can work or browse the web on one screen, and watch a movie or deliver a presentation on the TV.
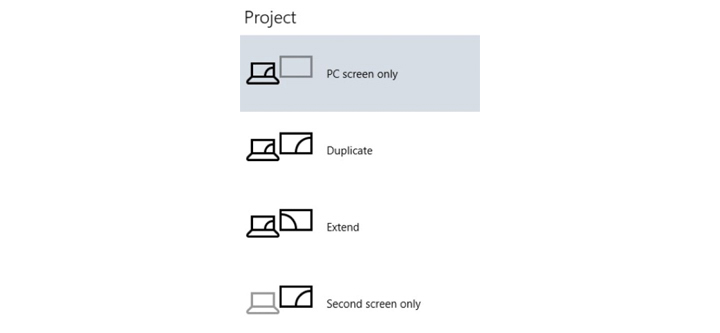
If you choose to extend the display to the TV, decide how you want your laptop to treat the position of the display – do you want to mouse off of the left or right edges, or would you prefer to drag windows toward the top (if you’re sitting on the couch, your TV might feel “on top of” your computer display). Properly aligning your monitors in the “virtual” space can make going between them much easier.
Right-click on your desktop and click on Display settings. In the window that pops up, look for Advanced display settings on the right-hand side, and click on it. You’ll see a new window with your internal and external displays labelled 1 and 2. To rearrange their positions relative to each other, click on the secondary monitor and drag it to the left, right, or above the internal display, then save and exit your settings windows.
On a Mac
If you’re using a MacBook, MacBook Air, or MacBook Pro, most of the above works the same way. Plug an HDMI cable in to your laptop (or use a mini-DisplayPort to HDMI adapter from Apple, if your laptop doesn’t have an HDMI port) to connect to to the TV. To change your display settings, mouse up to the upper right-hand corner of your screen and click on the apple symbol when the title bar appears. Click on System Preferences, and in the new window, click on Displays.
How to connect a laptop to the TV wirelessly
Wires? Bah! It’s 2016, can’t we cut the cable, already? You’re in luck, because you can do exactly that. Depending on your laptop and your TV, you might be able to do it without buying anything. Here’s how it works.
On a PC laptop
In Windows, you can take advantage of a wireless standard known as Miracast. Miracast lets you connect to a display wirelessly and mirror your laptop on your TV. Just about any laptop running Windows 10 can employ Miracast, since Microsoft built support for the protocol into Windows. Your TV, on the other hand, may or may not support it – chances are it doesn’t, but if you search Google for “[your TV’s model number] Miracast,” you’ll probably be able to figure it out.
 If it doesn’t, you can buy a dongle from Microsoft for less than fifty bucks that will let you use Miracast. Once you have the dongle, plug the main part into an open HDMI port, and plug the other half into a USB port on your TV to provide power (if your TV doesn’t have a USB port for this purpose, you might be able to use a powered USB hub to provide power, instead).
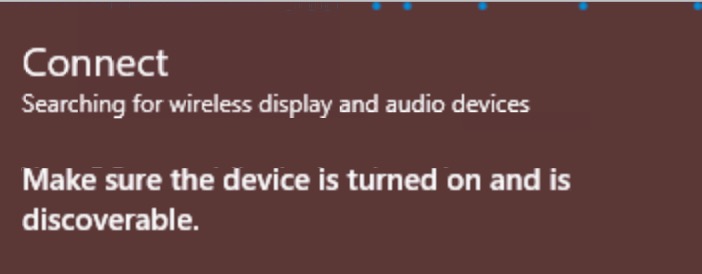
On your laptop, mouse over to the lower-right corner of your desktop and click on the notifications icon (if you have notifications, it’ll appear as a square, white speech bubble; if you don’t, it’ll have a clear background. In the translucent window that pops up, click on Connect, and if you’ve got a compatible wireless display within range, it’ll appear here – just click on it and follow the steps to complete the connection.
On an Apple MacBook laptop
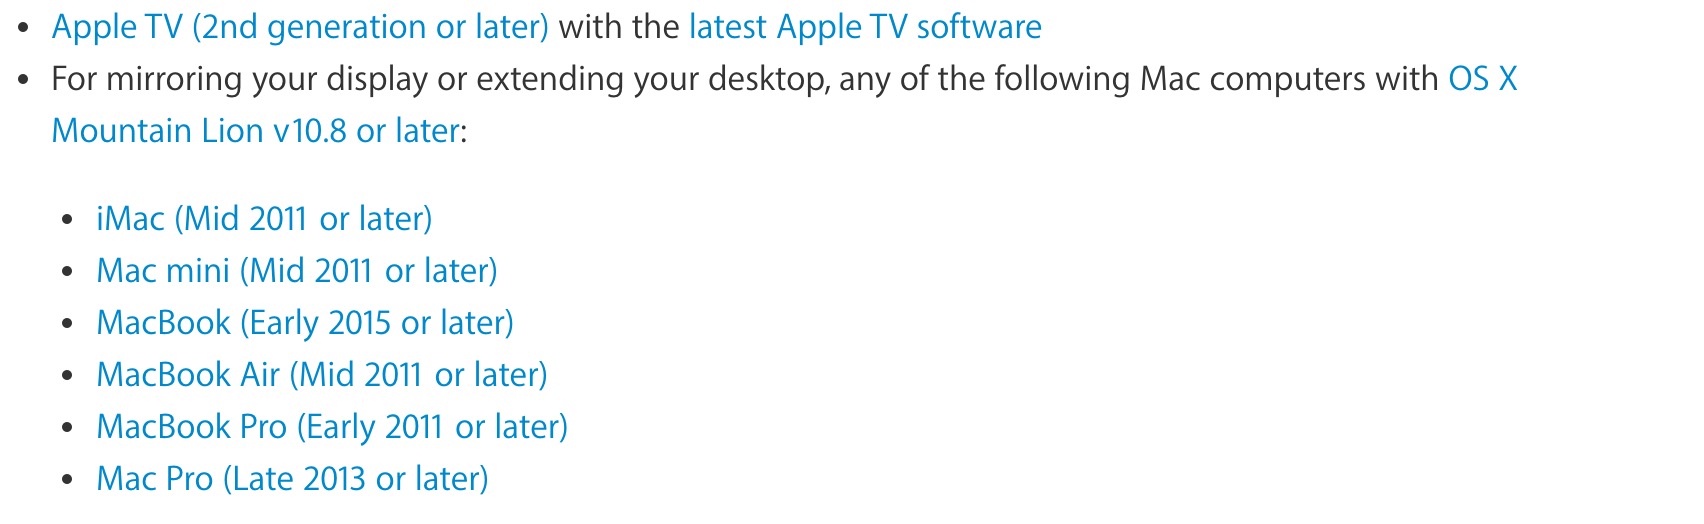
If you’ve got a MacBook you want to connect wirelessly to the TV, it’s pretty easy. Instead of a Miracast or other wireless dongle, you’ll need an Apple TV, instead. You can use any Apple TV from the second generation (note: the second gen Apple TV is limited to 720p; you’ll need a third or fourth gen Apple TV to get 1080p) on, and if your Mac is from 2011 or newer, you can broadcast your display:
When you’re on a network that has a compatible Apple TV, you’ll see this icon appear in you menu bar at the top of the screen:

Apple calls this the AirPlay icon. If you click on it, you’ll see a drop-down list of compatible AirPlay receivers – anything connected to an Apple TV (audio and video) or an AirPort Express (audio only) can appear here. Just click on the Apple TV that’s connected to the display you want, and after a few seconds you’ll see your desktop appear on the TV. Within this same menu, you can choose whether you want to use AirPlay to mirror your desktop or extend it.
You might want to buy a wireless keyboard
If you aren’t extending your desktop onto the television, you might want to look into picking up a wireless keyboard to use with your laptop. You can leave your laptop on the entertainment center next to the television, which is a good habit to get into if you usually use an HDMI cable – that way, you or someone else won’t trip over the cable as it winds its way across the room.
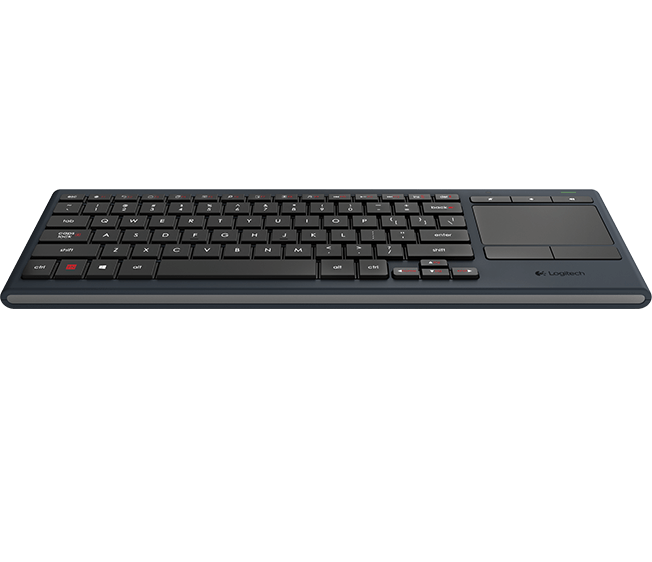 Hands down the best keyboard to buy for a home theater setting is the Logitech K830 Illuminated Living Room Keyboard. It’s a little pricey at $100, though you can often find it much cheaper on sale. It comes with a thumbnail-sized USB dongle that plugs into a USB port on your laptop, and that’s it. No complicated Bluetooth pairing or drivers to install.
The keys are backlit, making it easy to use if you’re watching something in the dark. The trackpad on the right isn’t as nice as the ones you might find on an Apple MacBook or premium PC laptop, but it’s responsive and supports two-finger scrolling – a handy feature if you’re browsing the web on the TV.
You might also consider picking up a second AC adapter if you connect your laptop to the TV on a regular basis. Check Craigslist or eBay (or a refurb site) for good deals on used adapters – that way you can leave your laptop on the entertainment center and watch or browse all day without worrying about running down the battery.
Related Posts
-

The Mission Mercantile Laptop Sleeve and Laptop Sleeve Vertical are a beautiful way to carry your…
-

PlayOn.tv is bringing March Madness to your Android device, Roku, Xbox and iOS devices. This…
-
On a desktop, 21 inches seems like a small monitor, but the Acer Predator 21…